“Human Skin – the Mental Ray Subsurface Scattering Fast Skin shader” by Philippe Le Miere

Subsurface scattering is light passing through and diffusing within a thin translucent material. Human skin is an example of such a material as it is made up of many thin translucent layers. A Subsurface Scattering material is ideal for re-creating skin in 3D computer graphics and is why the Mental Ray Subsurface Scattering Fast Skin shader was specifically created.
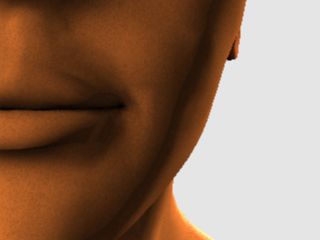
Ordinary ShadersTo compare the benefits of using the SSS Fast Skin shader, a model of the human head was set-up with a three point lighting system and a Phong material. The result is a plastic like artificial look due to the harshness of the shadows.

The model has been setup to use three Mental Ray area lights, as they produce softer shadows. The key light is positioned above the face and to the right, there is then a soft low fill light to reveal some of the shadow detail in the checks, and then a strong back light to model the jaw and lift the face from the background.


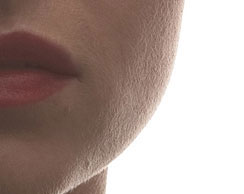
The default SSS Fast Skin ShaderBefore attempting to recreate any material it is always good to have a reference image handy. While 3d graphics can improve upon nature, a reference image can be used when things start to ?just not look right’.
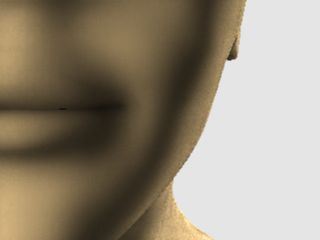
Applying the SSS Fast Skin shader with the default settings produces a wax like material. Note though the difference in the softer gradation of shadows.

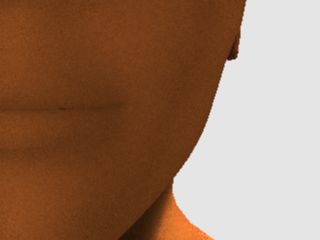
Scale ConversionThe SSS Fast Skin Shader is dependant on the scale of the model. It is best to use models that approximate real world sizes. The head model in this example is 190 mm wide, which, including the ears is the average width of the human face. Scale conversion can be used when the scale isn’t quite right by adjusting the overall subsurface scattering effect. In 3ds max 7, Scale Conversion is found under the Advanced Options. Setting it to 100 divides each of the three Diffuse layer’s radius: the Epidermal, Subdermal and Back surface layers. The result is a return to the harsher, darker shadows, and effectively disables the scattering. Play today at the best friv games website.

Setting the Scale Conversion to 0.1 produces scattering that is too big and grainy. The result looks like a red balloon as too much of the Subdermal layer (the lower bloody layer) is showing through.

Back ScatteringBack scattering controls how much light is allowed to pass through the object and can be used to show veins and arteries. To see the effect, turn everything off, except Back Scattering Weight. Applying the following settings produces a silhouette with partial transparency.
3-Layer Diffuse Subsurface ScatteringUnscattered diffuse weight = 0.0 Epidermal Scatter weight = 0.0Subdermal scatter weight = 0.0 Back scatter wieght = 1.0
2-Layer Specularity and Reflections Overal specular weight = 0.0
Scale Conversion = 1.0

Here the model has been rotated and lowered to expose more of the ear so as to highlight the back scattering effect.
The Subdermal layerThis is the middle or fatty layer and contributes to the red glow effect. To see its effect set Subdermal Scatter weight up to 1.0, and make sure the radius is set to 25mm.

Reducing the Subdermal radius to 1mm produces sharper shadows as seen in the following image:
At the other extreme, increasing the Subdermal radius to 100mm produces a strong scattering and a very soft appearance.
The Epidermal layerThe Epidermal layer is the top skin layer or outer layer. To see its effect, turn the Subdermal and Back layer off. Setting the material to the following settings produces:
Epidermal scatter weight = 1.0
Epidermal scatter radius = 8.0 mm
Subdermal scatter weight = 0.0
Back scatter weight = 0.0
Like the Subdermal layer and Scale Conversion, decreasing the Epidermal scatter radius reduces the scattering effect and increasing the radius enhances it, giving a softer result.
Epidermal scatter radius = 1mm

Epidermal scatter radius = 50mm

MappingAfter tweaking the three diffuse layers – Epidermal, Subdermal and Back ? the following image was rendered, ready for mapping:
Unscattered diffuse weight = 0.4
Epidermal Scatter weight = 0.5
Epidermal Scatter Radius = 8mm
Subdermal scatter weight = 0.5
Subdermal scatter radius = 35mm
Back Surface scatter weight = 0.5
Back Surface scatter radius = 25mm
Back Surface scatter depth = 25mm

Bump mapping Human skin has pores which are best represented by a bump map. Without the bump map the skin appears too shiny and smooth. Scattering will fill in the tiny crevices between bumps and make them appear less harsh. The effect is subtle, just like subsurface scattering itself, but important.

The bump map itself was created in Photoshop by filling a layer with 50% gray and then applying a Noise filter at an amount of 1%, Gaussian Distribution, and MonoChromatic. The result is a clean histogram with a bell shape fall-off to either side of middle gray.
Skin Specularity and Specular mappingThe SSS Fast Skin shader has two specular layers. The Primary Specular, used for broad and soft specular highlights and the Secondary specular which are much narrower and used for detailed sheen. Setting the Overall Specular weight to 1.0, to turn specularity back on and setting Specular Weight #2 also to 1.0 produces the following oily look.

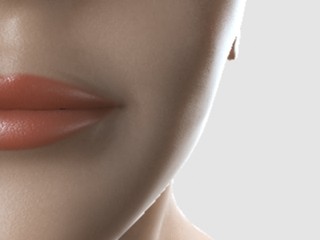
Human skin however is not uniformly shiny. Where the skin is closer to the bone, it tends to shine more and also around moist areas, such as the lips. Specular maps are used to control skin sheen, with white turning shine on, and black turning shine off. A specular map for the Specular Weight #2 channel was made so that the lips look wet and the rest of the skin has only a slight natural oily shine.

In the Specular Weight #1 channel a noise map is then used to soften and further control the overall specular effect.

Colour mappingThe Epidermal scatter color channel is used for colour mapping and a grey scaled version of the colour map is placed in the Unscattered diffuse color channel to control the diffusion of tones. Some of the skin colour comes from the diffusion of light in the reddish Subdermal layer. Here lipstick has been applied to the mouth and a little pinkness is added to the overall skin colour.

3Dtutorials.sk recommendation:
To maximise the realism of your 3D characters we recommend to use high quality human photo textures from the #1 texture website www.3D.sk
ReflectivityRaytracing the SSS Fast Skin shader produces a lot of light rays and can be computationally expensive. Turning on Only Reflect Environment turns off raytracing but still enables environment reflection. Here Reflection Weight is set to 0.1 and Reflection Edge Weight set to 1.0.
Setting a high Reflection Edge Weight ensures that the skin behaves realistically in that it reflects more when viewed from the side. As a lot of reflection was occurring around the edges of the inner lips, so a map was placed in the Reflection Edge Weight channel to prevent too much lip reflection.

Final GatheringFinal Gathering adds that extra touch of realism by adding a little extra light and softening of the skin. Here Samples are set to 100, Maximum radius to 10, and Minimum radius set to 5. Scatter indirect illumination, under the Advanced Options needs to be turn on, as it is turned off by default to save render time.
The final result is a subtle skin tone with all the complexities of nature.
SSS_01.max
skin_maps.psd
relink using the following maps:bump.jpgcolour.jpg diffuse.jpg reflect_edge_weight.jpg spec.jpg spec_wet.jpg
BibliographyAndersson, Z., Mental ray fast subsurface scattering tutorial, Berlin , Mental Images, 2004http://www.lamrug.org/resources/doc/sss-skin-tutorial.pdf
Alton , J., Painting with Light, Berkeley , University of California Press, 1949
(c) Philippe Le Miere, philippe@lemiere.com


Very useful!!
well, I really got a problem with this shader…I don’t know why, when I apply this shader, it just render out with many noise…even I ‘ve increase the sample numbers….the noise are still there, just a little bit smaller…
and I don’t have any idea with the lightmap…what kind of image it is??
thanks a lot, really need ur help..
Thank you for great help.