
Okay, let’s talk butterflies. First of all, this is a strictly butterfly tutorial. so I’m not going to get concerned with the background at all. Paint whatever you want for background, or don’t paint nothing at all, it works too. I start my painting process with drawing a very precise sketch of the butterfly. then transferring it on my watercolor paper.
General tips
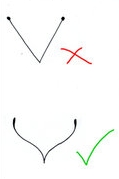
Antennae:
You might be tempted to draw them straight, with little dots on the top. while in fact they are usually a bit sinuous, gradually widening at the end.
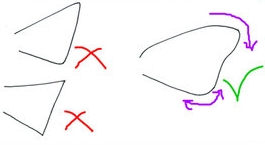
Wings:
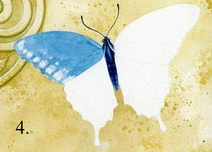
The important things is to keep in mind that the wings aren’t pointy, nor do their upper ends point upwards -they soft of droop down. The bottom end is usually pretty rounded. Look at the illustration to see what I mean.
The body:
The buttefly’s body consists of two parts but it’s not a “head” and a “body”, because the head is actually joined together with the chest. The eyes are on the sides of the top of this joined body part 🙂 The whole body is usually a little fuzzy.

The Body
So, you’ve made your sketch, transferred it and painted your desired background. Now it’s time to start on the butterfly. A piece of advice – if you are painting a background, it might be a good idea to mask the butterfly with masking fluid, especially if you’re painting a pale butterfly – you want to keep the colours as crisp and vibrant as possible.
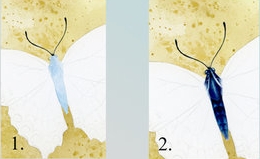
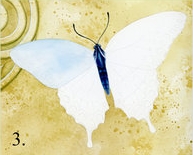
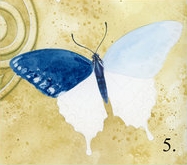
I like to get the body out of the way as soon as possible, mostly because it’s so boring. There’s a slight upside – if the butterfly’s body is the same colour as its wing, you can try the colour combination you are going to use (as I did here). I made a diluted wash of turquoise first, then I painted the antennae (with a tiny blush). Then came a layer of less diluted turquoise, prussian blue, indigo and a touch of purple (I’ve decided not to use the purple on the wings). And that’s pretty much it. Just keep in mind that the body is usually fuzzy and its bottom part consists of several segments (I don’t know the precise term here).
The Upper Wings
First of all there’s no universal way how to paint every butterfly. I use different methods for different butterflies. sometimes even for different wings of the same butterfly. But in a nutshell my technique lies in layering gradually darkening colours until the butterfly looks pretty 1 Let’s take a look.
As a very first thing I masked the little white lines along the edge of the butterfly’s wing. Then, once again, I started here with a single layer of a very diluted turquoise. I am working dry on dry hem and I leave every single layer to dry thoroughly before continuing with another one.
On the picture below can see the second layer • again turquoise, less diluted this time. I decided to paint around the pale spots on the butterfly’s wing and then mask them – but I’ve found with the second wing that it’s easier to just mask the spots right after painting the first layer and not bother with painting around.
As you can see in picture below, the pale spots are now masked and I’ve created a new layer – this time with prussian blue. Now let me be honest, I don’t care if the bottom layers are blotchy
and uneven. I let them dry as they will, since I know they’ll even out in the end. So don’t worry if the middle steps of your paintings get a bit messy 🙂
One last layer of indigo and the wing is almost done! Now is the time for removing the masking fluid and playing around with the details a bit. One thing I like to do at this point is to add a layer of dots with a shade darker colour than is the final layer. That’s not possible hem, as the butterfly itself is very but if you’re working on a more pale one, I strongly recommend it, because it creates a nice texture for butterfly wings (they are after all made up with small wales)

The last part – the details. When you remove the masking fluid, you can find out that the shapes are too sharp and unprecisc, simply undetailed. So what I did here was to add a layer of turquoise dots on the (almost) white spots. and then I just added some indigo spots and white gouache to create highlights. I generally don’t like using gouache, but it works nice in these cases. I also outlined the wing with a bit of indigo, to make it more contrastive. The wing is done. As you can sec. I’m already working on the other, using the same process I’ve just described.

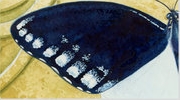
Close-up of the finished wing.
The Lower Wings
The beginning here is very similar to what I did on the upper wings, but otherwise I’m going to approach this a bit differently. Since the lower wings are more intricated, I’m going to paint each section of them separately. Nevertheless, I’ve started with two layers of diluted turquoise. (You may also notice that I’m working on the second upper wing as well).
Here the second upper wing is finished, but what is more important is that I painted (with less diluted turquoise this time) the parts of the lower wings that are supposed to be dark. I try to not create sharp edges where each area ends. I rather try to paint with small dots to create the texture of the wing.
In this picture you can clearly see two different steps of the process. The left wing has had another layer added (with prussian blue), the right wing is done in turquoise and waiting for the darker colour. You may notice that I’ve painted a lot of little dots here 🙂
I am almost finished at this point. I’ve created a layer of small dots with indingo mixed with prussian blue. There’s nothing difficult to this technique, it just requires a bit of patience (though when you master it it is actually quite quick) and it works wonderfully as a texture. Now you can see that the pale spots are too stark and undefined, to I am going to focus on them next.
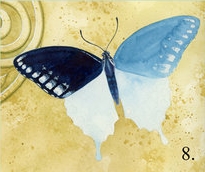
This is the last part, the finishing touches. And once again, I’m working with quite diluted turquoise and adding little dots to create the illusion of a texture. Nothing difficult to this 🙂 You can do this in layers too. I do, in fact. First comes a layer of pale dots, then a couple of darker ones. Among the last things I do is that I paint the little orange spots on the wings (yellow and orange layer) and outline both of the wings with indigo. And I’m done with the butterfly itself. Now, if you choose to paint the butterfly on some (semi)realistic background, you shouldn’t forget that the butterfly is in fact casting a shadow. I’ve mixed an ochre, umbre and hooker’s green and made a quick. diluted layer with this mixture to add the shadow here. This is the end of my butterfly tutorial. I hope it proves useful to you. If you read this till the end. you’re good and you deserve a look at some details (and possibly a cookie)! 🙂


You can check the final image in high-resolution here (800 x 558, 580Kb).
To get more texture of Bugs, we recommend visiting 3d.sk site.


Latest Comments