
Took me quite a few hours to complete. Another project I just got wound up in and had to complete. Thanks!
Step 1
Okay, so let’s pretend I have no idea what I’m doing…
The hand is a very important part of the body that can either flow with a picture or it can be a distraction. This tutorial isn’t going to help you where to place hands in your picture but the basics of hands and what they can do and basically how to draw them.

Step 2
First, we’ll briefly discuss the anatomy of the hand. Ifs good to know the bone structure of the hand so to understand better how and why the hand works how it does.
The hand la broken up into five major parts, (not including the arm its attached to) There’s no real reason to remember the bones exactly, just knowing more about them is helpful. This is not a detailed drawing of a skeletal hand.
The hinge joint is where the fingers bend, the ball joint is where it rotates. Metacarples and Carples are covered by muscles and skin and then you have your five individual digits- the phalanges. Exciting isn’t it?
Okay, now you have to take a quiz… ha just kidding. If you want to, you can practice drawing the bones. Next we’ll talk about how to place them.
Firs, you have to know the knuckles placement. They’re not straight

Step 3
The knuckles curve- the middle finger knuckle is higher than the rest.

Step 4
If you’ve drawn the bones first you can trace around them to draw the hand.
Don’t trace tight next to the line of the bones, you have to account for muscles and tendens as well. We’ll forgo the muscles- mostly since I don’t know them well enough. xD So we’ll just trace around the hand and see what we get shall we?

Step 5
Look! A hand! ^^
Okay, now, how do the fingers sit on a hand? Well, let me tell you! That’s why you are here is it not?>.>; Fingers are not straight across. Look at your own hand, see the variance? Okee. So here.

Step 6
The finges st an angle. We’re not doing Egyptian hieroglyphics here. The middle finger is the highest. The index almost level with the ring finger, though typically the ring is a slightly higher. The pinky is the shortest. And the thumb lines to below the second knuckle, about half way.

Step 7
Well, now that you know the basic elements of a still hand, lets talk about some base elements of the details of a hand- the back of the hand and the palm. All simple like (meaning the anatomy lesson is over). Okee? Okee!

Step 8
Holy crap this is long… but hands are not simple, so if you want to learn more, keep scrolling down! -ID If you haven’t learned anything at all, you’re free to leave. But what if I say something you don’t know, ever thought of that ? Hmm? xB
Remember to tilt the lines between the fingers, they curve with the knuckles.

Step 9
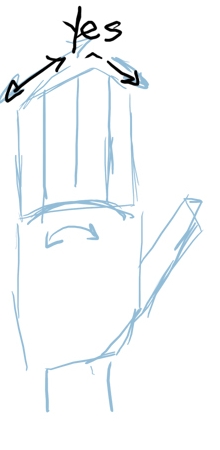
Okay, so we have the basics down of a hand. Now what? How do you draw a hand? Well, it takes a lot of practice for one, and patience for another. Remember- you always have reference right in front of you- your non-drawing hand. One way is to use lines and circles, like so:

Step 10
A good way to picture things in blocks. Blocking the hand into sections will help you to see how it bends and moves, and it will also assist you in being able to put it into different positions, including all perspectives.

Step 11
Practice drawing hands in different positions with blocks. Sketch it real simple, and then block it off. Ilse your own hand for reference if you want to see how a finger beads.

Isn’t tins fun? Are you having fun yet? Want me to totally shut up, Too bad!
So, yes, ids not over, still more to discuss. Ho-boy I bet you’re thinking I’m longwinded. =P Love you too, mate.
winded. =P Love you too, mate.
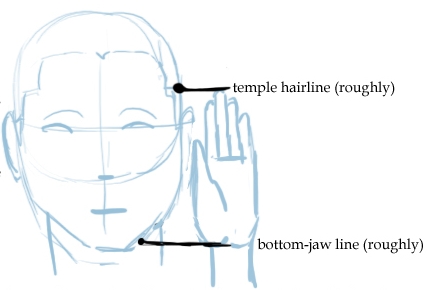
So- let’s move on. you’ve practiced right? You’re expert and boxing and sketching your hand right? Right Welt before I tell you about perspective, let me tell you something about how big a hand should be. Too small of a hand looks weird, so a good rule of thumb- your hand measures from the bottom of your jaw, to your hair line. (you bald people will just have to wing it r^_~)
As seen here:
Step 12
Ooo little head lesson too. heh.
Middle finger, just above temple hairline, bottom of palm touch to about bottom of jaw. That’s average. Naturally, some people have bigger or smaller hands.
Step 13
Are we there yet? Well, dunno where we’re going- so just hang on tight and enjoy the ride. Now to perspectives. Wee, this’ll be fun. o_0;
Always remember you have your own hand to reference from. Mirrors are good to have around as well. What happens in perspective, fore-shortening. Think of a cylin der. Like so.
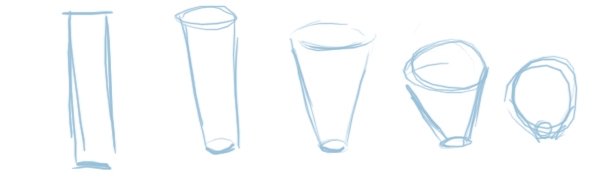
Step 14
Imagine it being tilted, and you see the bottom of the cylinder stays the same size, where the top gets larger and rounder as it tilts forward, until you can’t actually see the bottom any more. It’s how the vanishing point works. It works with hands the same. Here are some perspective poses. Feel free to ref sketch from them.
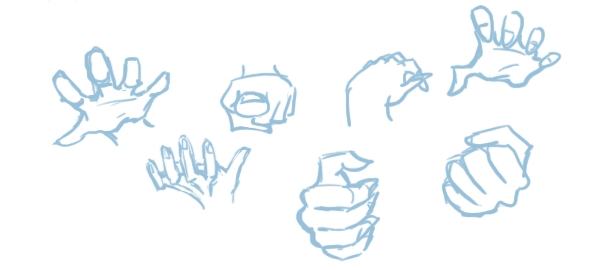
Step 15
Okee, so that was loads of fun wasn’t it? Now all you have to is practice different hand positions. Sorry there’s no time for shading. Another time perhaps. I hope I’ve been of some help to you and that you learned something this tutorial- even if it’s simply that you will never read another tutorial of mine again.
Have fun drawing hands! Just pose away!=D

You read the whole thing! Yay for you!
Thanks for stopping by and not leaving too disgruntled’! You will
now become an expert in drawing hands! If not, don’t sue me. xD::
Have a lovely day!
To get texture of human body, we recommend visiting human-anatomy-for-artist site.


Latest Comments