“How to compose shadows provided by a HDRI lighting” by Gerardo Estrada
This tutorial assumes you have acquired your light-probe in location and you have already made your HDR map.
One thing we need to keep in mind when we are integrating CG elements with live action plates is that a shadow provided by a HDRI lighting is not a shadow properly, is a shade.
In Lightwave (and most common 3D packages), only lights generates shadows; shades provided by GI aren’t interpreted as shadows; so if we are lighting a scene only with HDRI, we can’t extract a shadow buffer.
If we wanted to extract a shadow buffer, we’d need to add lights that only cast shadows (shadowmaps or raytrace), this lights rig are commonly negative lights that mimics HDRI lighting. Then we’ll be able to generate a shadow pass with PSD_Export, Buffer_Export, ASA_Buffer_Saver or simply setting the surface alpha_channel according to shadow_density (SurfaceEditor / Advanced).
Note: G2 includes a special tool to solve this very easily within LW too, with LSD tool (Luminous Shadow Darkening), very cool feature!
Besides, if we are lighting only with HDRI, there are other ways to solve this (without compose) within Lightwave; the most simple way is using front_projection in our local scene.
However; what happens if we want to solve it in post-production? (as commonly is needed); and we are solving our scene just with HDRI lighting? this means no lights, no shadows, just shades provided by GI.
The solution that works with all packages is to use a differencial rendering technique, in simple terms is to make a difference image of our local scene (lighted by the light-probe but without CG elements) to produce the alpha for the foreground shades.
We’ll see this compositing process in LW, Photoshop and AfterEffects (but the same process is applicable for other composting packages too).
Let’s begin with Lightwave (yes we can compose within LW too):
For this tutorial I’ve used as a CG element, the cage_freak_final_01.lwo (by Aristomenis Tsirbas) provided in the LW ClassicContent folder, and a table (a simple plane) for the local scene; distant scene in this case is a lightprobe (kitchen_probe) provided in LW Content too, used in Textured Environment. I guess there are several ways to to this in LW but in this case we’ll use Textured Filter (Effects/Processing/Add_Image_Filter) for the compositing process; I think this tool (TF) may be more powerful than LW compositing panel in many cases.
Then, for the basic setup we have:
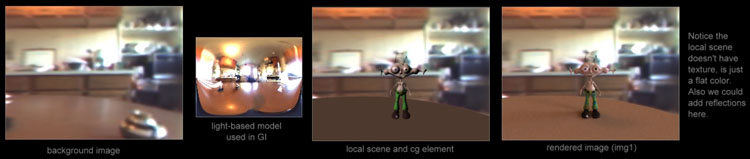
Note: there are several ways to determine the reflactance characteristics of our local scene, but for explanatory purposes, we’ll estimate an average of color and diffuse properties by observation.
A nice tip to find out the proper color, is to load our background plate in PS or any 2D software, select an area of the local scene where lighting is measured and apply it a lot of Gaussian Blur; commonly what remains is one flat color; pick this color and take note of its RGB values; then copy these values in your local_scene surface (table). Render. Compare and adjust luminosity or saturation (from Color Panel) or its diffuse value. Render again until you match the flat color you got originally (this process assumes you have the appropriate gamma and exposure for your light-based model)
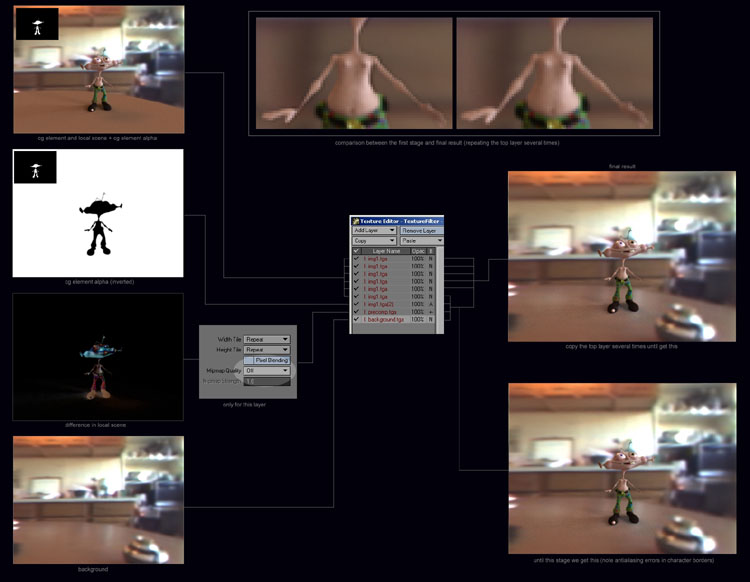
To produce the difference in local scene, we need the image(s) of our CG elements and local scene (let’s call it “img1”), and our local scene without CG elements (let’s call it “img2”), both matched with the background and lighted by the same light-probe:

Notice img2 is adjusted in difference mode and we have turned off Mipmap Quality for both layers. (Let’s call “precomp” to this result). In LW we need to render this layer at quadruple resolution because if we don’t do it, we get an annoying border of the CG elements in precomp; this is because apparently, LW interprets the alpha channel as Premultiplied (matted with black color) and also, since we are using Textured Filter, pixel_blending option “increases” the situation. In a composition software we’d solve this simply changing the alpha channels to Straight (unmatted).
Finally, in other composition (Textured Filter), we set our background layer as the bottom layer, above this, we set our difference matte (precomp in difference mode), precomp should show only the shadows, so we set above this, an inverted version of our cg_element alpha so that precomp shows only the shadows area. To complete the composition we set, above all these layers, the cg_element layer with its alpha enabled; but if we leave the composition at this stage we can get annoying borders on our CG elements (due to how LW interprets the alpha channel). A simple way to solve this is to repeat the top layer several times.
We have to recognize LW isn’t the best tool to solve this, but always is useful to know that is possible and to know how is possible 🙂
Now, let’s supose we don’t make animations (nor have a compositing package) and we need to compose a CG element with a photograph. In this case, Photoshop would be our obvious option:

Notice we?ve saved our images in psd format, since is more easy in this way get the proper alpha (besides we don?t need to play with PS Matting Tools)
In case we have a compositing software, the process is even simpler. I show the process here with AfterEffects, but the principle is the same for any other compositing software.
3Dtutorials.sk recommendation:
To maximise the realism of your 3D rendering we recommend to use high quality photo textures from the #1 texture website www.environment-textures.com
There are many ways to solve this task with these tools depending on the complexity of the scene, so take this tutorial simply as an approach to the differencial_rendering technique 🙂
(c) Gerardo Estrada, gerardstrada@yahoo.com


Latest Comments