
 gmail.com
A person who loves drawing (since she was 3 years old). Her unique style of traditional anime drawings have made her artwork instantly recognisable. Favourite tools: Colour and mechanical pencil.
This is tutorial after Face tutorial. Hope you can find a bit help from it. Quick tip – use a cotton bud. Thanks for your wonderful support.
Step 1
* Some of peoples usually ask me about my turquoise colors, and because they are my fav colors too, sal will color her eye with Turquoise tone :D.
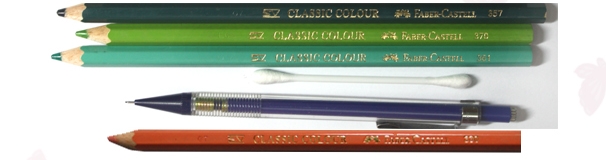
* I pick 3 colors with different ton is Dark Green (if you use Faber Castell as will please pick 357), Green (370), Turquoise (361), Skin Color (330)
* You also need one cotton bud (for blending you can use or finger but it will dirty your fmgers if you want too,:P
* One pencil (I usually use mechanical for shading, that was my habit) bull think better you should use normal pencil and take HB pencil please.
Step 2
* Please forget about shading around her eyes ^ ^, that was in skin’s coloring part.
* After face lineart tutorial now we start with empty eyes :D. What you need here is please draw 2 very tiny curve lines in her eyeballs (they will make eyes look better at the end).
Step 3

* Use Turquoise (361) color the space between 2 out lines, you don’t need to press the color pencil cause some of pencil dust (from pencil sketch line) will blend with turquoise and will make it darker some parts 😀
Step 4

* This time please pick your pencil and color the space next and outside turquoise part:) (just more than a half). Better you work with HE or lighter pencil. Dont use 2B or more than that if you want dark or black eyes.
* Remember to give a bit effort for shadow of comers please.
Step 5

* Sorry for blur photos D: (-_-“)…Take back your lovely Turquoise pencil (361) and color over the pencil space just now you did:) and again gives bit effort for shadow of corners please.
Step 6

* Use Green pencil (370) colors left space but you must remember left a bit white space at the end/small corner of the eyes.
Step 7

* If you want your colors look smoother then you may want to use Cotton Bud (or your finger :D…but I recommend you to use Rose Bud cause they will look better ^ ^.
Step 8

* We use the last color pencil now =). Use your skin color pencil (330) colors the outer white space. Please color it soft and light :D.
Step 9

* Last step now…Yay… (^__^) Use pencil (must be sharp pencil) to draw shadow for her eyes.
* Remember make it in curve lines (^3^).
Step 10

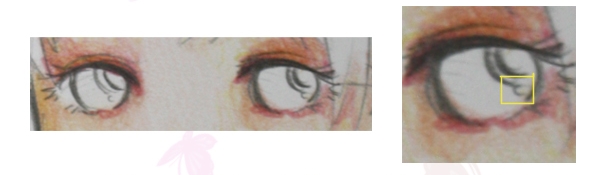
* And here is the result (hope it tams out not so bad).
* I hope you can find it helps a bit. 😀 Skin’s tutorial is coming up next
* Thanks for reading & Have a nice day.
* By the way, something you should always remember is you pencil & colors pencil always must be sharped because that will be easier for drawing and coloring.
To get more texture for human Eyes, we recommend visiting 3d.sk site.


Latest Comments