Step 28
By nature, these two filters are very similar (one might say two opposite sides of a single effect). You can not see anything because the layers hidden by layer masks. Take a Brush Tool (B) with soft round preset and white color. Experiment with layers and combination effects by brushed on a layer masks interested places in the image (eg sneakers cubes on top of the image, the edges of the basic cubes). I do not recommend that you apply the effect to the model and covering the entire picture texture (you lose the realism). Better to just keep some places without effects.

Step 29
And now come lens flares! The archive with lens flares (that you had to download) you can find a huge variety of fine images (most importantly, do not use them all, and there will be a lot :)) I used only two images. The first flare is “BlueExplosion”. Place this image and increase it’s size to a working area. Place the flare on the top cube as shown below and change Blending Mode to “Screen”. To reduce the effects of glare add “Levels” adjustment layer with following settings – Blacks: 25, Midtones: 1.06 and make a clipping mask to a flare layer. The second flare is “OpticalFlare9”. Place it near the model ‘s leg and change Blending Mode to “Screen”. At this time, we will change flare color to a cyan. Add an adjustment layer “Hue/Saturation” with the settings – Hue: -16 and don’t forget clip this layer.

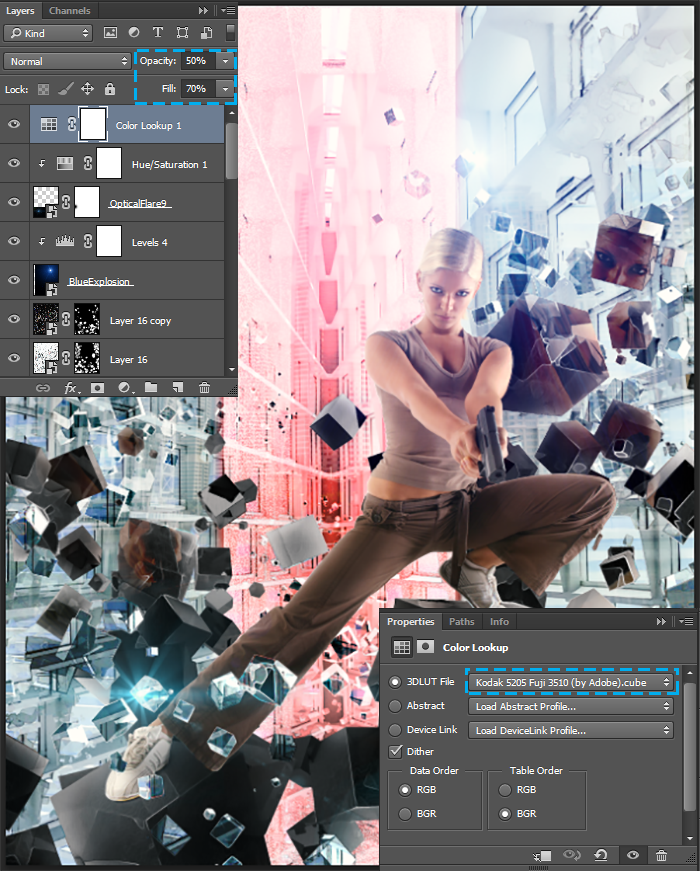
Step 30
We have in the end. The final step in our photo manipulation is to work with color. To create a beautiful and realistic lighting I use sequence of four adjustment layers. The first of these is the “Color Lookup” (Layer > New Adjustment Layer > Color Lookup…). In Properties window check “3DLUT file”, from the drop down list, select “Kodak 5205 Fuji (by Adobe. cube)” preset, Checked “Dither”. Set Opacity for this layer 50%, Fill to 70%.
Now a gradient. This adjustment layer, we add a bit of contrast. Set up default black & white gradient, Mode: Linear, Angle: 60 degrees, Scale: 140%. Set Blending Mode to “Soft Light”, Opacity around 40%, Fill around 50. This gradient lightens the top of the image and darken the bottom.

Step 31
Next adjustment layer is “Color Balance”. On this layer I add blue tone of the image to create an atmosphere of purity and lightness in the image (as the building of the future and portrayed despotic society: all white and clean, but behind it a terrible darkness or something like that). So, set for each tone following valuers:
Midtones
Cyan – Red : -5;
Magenta – Green: +9;
Yellow – Blue: +5.
Shadows
Cyan – Red: -1;
Magenta – Green: -5;
Yellow – Blue: +3.
Highlights
Cyan – Red: +1;
Magenta – Green: -2;
Yellow – Blue: +3.

The last adjustment layer, we will add more saturation. Add adjustment layer “Vibrance”. Set Vibrance: +15, Saturation: +11. I like the contrast and saturation in this image. Color always plays a very important role in a picture, because it conveys the mood, emotion.

Step 32
Now add some blur to create a presence movement/storm. As I promised you I will talk about the filter “Path Blur” from a Blur Gallery. This is a new feature in Adobe Photoshop CC 2014 which allows you to create a blur in a path way and now we will check it. Create a merged copy of entire image (Cmd/Ctrl + Opt/Alt + Shift + E) and convert it to Smart Object (right click on layer > Convert to Smart Object). Go to Filter > Blur Gallery > Path Blur…Set Speed: 20%, Taper: 0% and check box on “Centered Blur”. Draw two curves. On the left top to the right bottom corner and the second from the bottom left corner to the right and upward. Use midpoints to bend curve.

On a Smart Filter layer mask remove some effect from the middle of the image, the model and some cubes in the foreground. Use black soft round brush with Opacity around 50 – 100%. This is a very creative process, and you can decide where to leave effect, and where to clean. You can see the image below to see how I did it. Unfortunately the owners of Photoshop CS versions to create the effect of motion will have to apply filter “Motion Blur” (Filter > Blur > Motion Blur…) to cubes from step 12 and 22. (Angle: -50 degrees, Distance: 15 pixels).
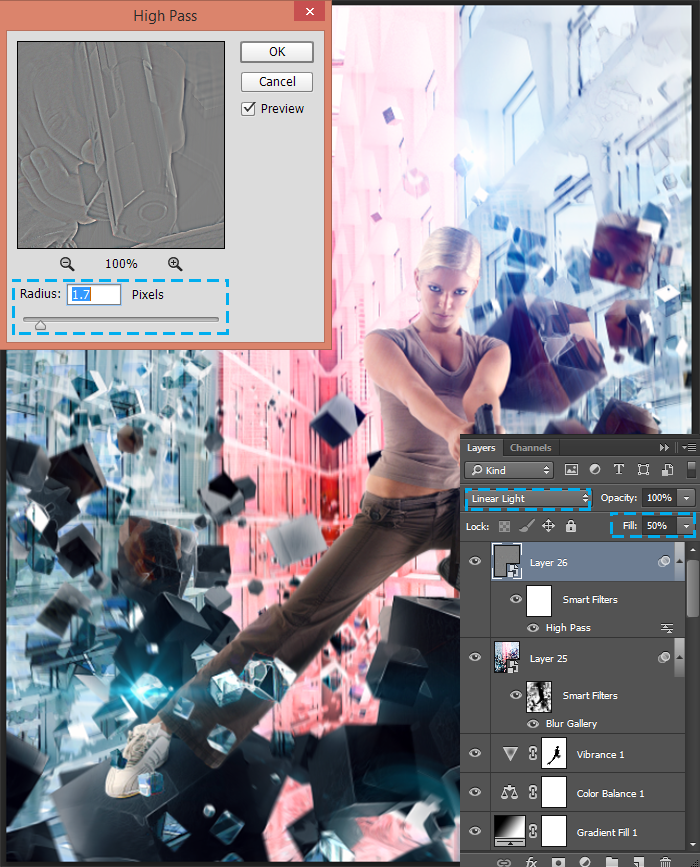
Step 33
To increase the sharpness of the image. Create a merged copy of image (Cmd/Ctrl + Opt/Alt + Shift + E), convert it to Smart Object (right click on layer > Convert to Smart Object). Go to Filter > Other > High Pass. Set Radius to 1.7 pixels and click OK. To get rid of the gray background change Blending Mode to “Linear Light”. Using this mode will overlay greatly increase the brightness, so reduce Fill to 50% (do not use Opacity).
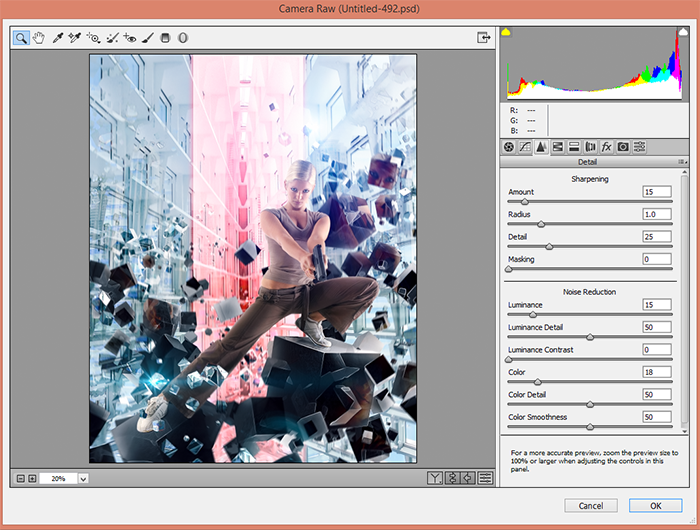
A little tweak color and sharpness using a filter “Camera Raw” (Filter > Camera Raw Filter… or Cmd/Ctrl + Shift + A) with the settings Contrast: -5, Highlights: +4, Shadows: +3, Blacks: +15, Clarity: +8. Add a bit Sharpness – Luminance: 15, Luminance Detail: 50,Color: 18,Color Detail: 50, Color Smoothness: 50,Amount: 15, Radius: 1.0, Detail: 25 and hit OK to apply changes.

Final result

Well, that’s all! I hope you enjoyed this tutorial and you could find it useful. I am satisfied with my result. I hope that you are satisfied your result too and spent time with benefits. Thank you very much for taking the time to study this tutorial! I wish all lucked in your future achievements! I thank the authors of resources for their excellent work and good quality! More of my work can be found on my pages Facebook, Deviantart, Behance. I am open to suggestions and cooperation! With best wishes!
Pages: 1 2


Latest Comments