“Creating morph targets” by Glen Southern
Introduction
How to export a Poser 4 `Michael` (from DAZ3D) Mesh head, modify it in ZBrush and then export it for use as a morph target
GETTING STARTED
The previous tutorial in this series showed you how to export an .OBJ mesh from Poser and get it into ZBrush. This tutorial is similar in the initial stages but has one big difference. The .OBJ file that is created in ZBrush needs to have the same number of vertices as the original export or it cannot be used as a morph target. I chose to use DAZ3D`s `Michael` mesh as a model and turn him into an Ogre.
I firmly believe that ZBrush, when mastered is one of the best free form modeling tools on the market. The modeling skills that you require to complete the ZBrush section of this tutorial will need to be practiced to become proficient. Once you are comfortable with that, any morph you can imagine is possible with this method.


3Dtutorials.sk recommendation:
To maximise the realism of your 3D creatures we recommend to use high quality human photo references from the #1 reference website www.3D.sk
EXPORTING HEAD AS A MESH
As with the first of my ZBrush tutorials the first thing to do is get the head mesh out of Poser 4. Load your model into Poser.-Go to FILE>EXPORT and select Wavefront OBJ-Select SINGLE FRAME from the `Export range` dialog box that pops up.-The `HIERARCHY SELECTION` dialog box now gives you the option to select which body parts will be exported.
Remove the check mark (little cross) next to everything. The quickest way is to un-check `universe` as this switches of the whole lot. Then recheck the `head` box. This will allow us to export just the head without eyes or neck.
You will then be presented with a dialog.
-check `AS MORPH TARGET (No World Transformations)`
-Name the mesh and save it in a local directory on your machine. (I used zbmorph.obj)
IMPORTING INTO ZBRUSH
This section is similar to the previous tutorial Importing meshes into ZBrush. It`s easy and is achieved with the help of a `POLYMESH TOOL`(1).
-Launch the application and look for the TOOL panel (usually on the right-hand side of the screen). -The `POLYMESH TOOL`(1) is the little star shape shown in the image opposite. If you can`t see it at first `click` into the biggest of the tool windows and a `popup` window with give you a selection of TOOLS to choose from. `Polymesh` will be there.
-Once selected this tool give you an range of options that the other tools don`t provide.
-Go to `INVENTORY`(2) – then `IMPORT` (3).
-Use the import dialog to locate `zbmorph.obj` and select it.
-The mesh will be imported and you should see a small image in the tool window next to the star and another head image in the DRAW window if you have that panel open (4)
-You may see a message saying `this mesh has 8 non standard polygons that have more than 4 sides. These polygons will be converted to quad and tri sided polygons.` Don`t worry. Click OK.We now have a mesh head in ZBrush with the same number of vertices as the original OBJ export. We can now move on to editing and changing the heads shape but without modifying the underlying geometry. If we were to smooth the mesh out or subdivide it in any way, Poser would not allow it to be used as a morph target.TIP: ZBrush Version 1.23 sets the `TRI2QUAD` setting in the TOOL>MODIFIERS>INVENTORY to `0` by default. If for any reason this is set to any number above `0` when importing, you may not be able to export the mesh for use as a morph target. It`s worth checking.

PREPARE THE HEAD FOR MODELING
-To begin editing we must draw the head into the current document window. Make sure the head is selected in the `TOOL` window.-Click into the center of the document window. Holding the mouse down drag out the head mesh. It will be a shaded mesh (usually light gray) and may well be back to front at this stage.

-To begin modeling we need to enter `EDIT` mode. Press `T` on the key board or use the `EDIT OBJECT`(1) icon in the `TRANSFORM PANEL`.(3)-you should now see a Red dot and red ring which means you are in edit mode. (2)-Click/hold away from the head and drag left or right. This will rotate the head as you move the mouse. Bring the head around to the front looking right at you.-At this stage if you wish to see the mesh in wire frame you will need to change the preferences. Find these at the top of the screen in icon form or at the left hand side of the screen.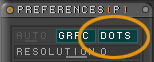 – Click/select `DOTS`-If you now click into the document window (away from the head) as before the shaded head will turn to wireframe while the mouse is held down.
PLEASE NOTE: Any Wire frame images in this tutorial that are black wire on white background are `inverted` images for ease of viewing only.
![]()
MODEL AN OGRE
-To model the head into the shape we require, we will push and pull the wireframe into the shape needed without changing the geometry.
-As we are in `EDIT` mode already (red dot and ring showing) we can begin to modify the mesh.-Firstly we need to make sure that we only effect the mesh in small amounts. Go to the DRAW panel and set the DRAW SIZE (1) to about 30 and the Z Intensity (2) to about 5.
TIP: A lot of the editing process involves adjusting these two settings a number of times. A large draw size effects a large area. A large Z intensity makes the effect more pronounced. This will take practice to master but is the key to modeling in ZBrush-You can also use SYMMETRY in ZBrush to help keep your editing symmetrical on the head. -GO to TOOL>MODIFIERS>SYMMETRY and select `X`.You will notice that your red dot in the draw panel is now 2 red dots and will work across the head in a symmetrical manner. Any editing is applied to both sides at the same time.

-The first thing to do is to pull the head into a basic Ogre shape. -Select the `MOVE` ![]() icon in the transform panel and pull the chin down a little (2). Then pull it to out to the side. You will notice the SYMMETRY duplicating your moves.-Pull out the cheeks bones, the ears and the brow. Rotate the head a little to ensure you see the moves from more than one angle to prevent distortion. (3)-Click away from the head and rotate it forward a little. Check the adjustments that you made and do more. Pull the bottom jaw forward a little. (4)-Then pull the lips wider apart and pull the brow further out. Keep rotating as you go.-NOTE: At some stage you may wish to add a little depth or push on the mesh a bit. Use the `DRAW POINTER`
icon in the transform panel and pull the chin down a little (2). Then pull it to out to the side. You will notice the SYMMETRY duplicating your moves.-Pull out the cheeks bones, the ears and the brow. Rotate the head a little to ensure you see the moves from more than one angle to prevent distortion. (3)-Click away from the head and rotate it forward a little. Check the adjustments that you made and do more. Pull the bottom jaw forward a little. (4)-Then pull the lips wider apart and pull the brow further out. Keep rotating as you go.-NOTE: At some stage you may wish to add a little depth or push on the mesh a bit. Use the `DRAW POINTER`![]() icon which allows you the paint depth onto the mesh without editing the geometry. To `push in` or `indent` hold down CTRL (pc)Using the methods described above try to match the progression in the image below. It will take practice!TIP: If you want to see it shaded instead of wireframe turn the DOTS off in the preference panel.
icon which allows you the paint depth onto the mesh without editing the geometry. To `push in` or `indent` hold down CTRL (pc)Using the methods described above try to match the progression in the image below. It will take practice!TIP: If you want to see it shaded instead of wireframe turn the DOTS off in the preference panel.
 -The head you should end up with needs to look something like this guy…
EXPORTING FROM ZBRUSH- Now that you have a finished head mesh you need to get it back out of ZBrush as an .OBJ so that Poser can use it.-With the head still in `EDIT` mode go to TOOL>MODIFIERS>INVENTORY and use the setting shown here.. -then click EXPORT- This will allow you to export the mesh as a Wavefront .OBJ (the same format that it was imported in an.- When you get the save dialog choose a name for the mesh and save it. (zbogre.obj
MAKING THE MORPH TARGET
-Back into Poser load the Michael figure and if you wish `pose` it.-Double click on the head.
-You will get a dialog. Click ADD MORPH TARGET. Click it.-Put a name in the label section. I used `OGRE`. This name will be used in the morph wheel so make sure it`s a name you will recognize.-Then use the locate geometry button to find the zbogre.obj file.
-When you click OK a morph wheel will appear with the other preset morph targets. -called `OGRE` -And the final bit. Rotate the wheel the turn Micky boy into an Ogre headed Micky boy 🙂

(c) Glen Southern, glen@southerngfx.co.uk


Latest Comments