“Creating a Stainless Steel Material” by Montree T.
 This tutorial was written from my experience working on metal materials personal observations and from photographs.There are 3 important things to remember when you create a stainless steel material.1. Strong HighlightAlthough the metal shader is the easiest way to create a stainless steel material, it has limitation in creating the highlight, so I prefer to use either multilayer or anisotropic, as we can play with its several highlight shapes.
 2 layers of specular level on multi layer shader
 The different between the highlight shape of the blinn shader and the anisotropic shader
3Dtutorials.sk recommendation:
To maximise the realism of your 3D rendering we recommend to use high quality photo textures from the #1 texture website www.environment-textures.com
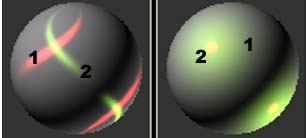
Besides the really strong highlight on the stainless steel, that we can create by changing the basic specular level and glossiness parameter, I found that there is another strong illumination of light caused by the reflection on the stainless steel surface (the highlight appear inside the reflection) that also looks like another highlight. As this illumination doesn’t have an exact shape, depending on the light in the environment of the reflection. i.e. Some appear like thin vertical lines and we need to use anisotropy to create such effect.
 Faking the highlight in the environment reflection using anisotropic
Use First specular layer that we have in multilayer shader as a real highlight, so we can adjust only the specular level to be higher and lower and use glossiness to make the highlight look more obvious.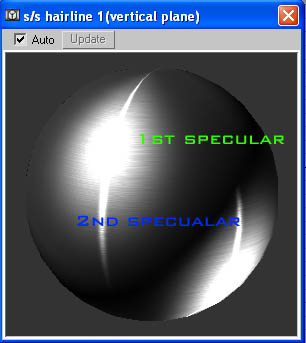 The First specular Level is the real specular and the Second specular Level is the one that appear inside the reflection.I also make the Second specular level to be as strong as the First specular layer, but this time I adjust the anisotropy parameter to be higher so the highlight shape is thinner. The orientation will be changed as well if the effect of the anisotropy doesn’t appear correct. ( The orientation is a value in degrees that can range from -9,999 to 9,999. Default=0.)

The different shapes of specular highlights caused by changing the orientations.
Put a scratch or brushed metal map in the specualar map slot for more detail in the material highlights.
 2. Low Diffuse level The nature of a metal is that it has strong specular highlight and reflection but it has a diffuse level scale (in 3ds max) lower than a normal shader (the brightness of the difuse color is less than normal). If we are creating the stainleess steel with an anisotropic shader, we have to make the anisotropy parameter lower than default. I normally use is around 25 – 70.
 3. Motion Blur Reflection The reflection on stainless steel is very refractive and blurry (for example it looks like a motion blur effect in photoshop). The best reflection map in 3dsmax is to raytrace, but I found no such effect in raytrace that is similar to the effect seen on stainless steel. Though we can use “multi resolution adaptive antialiaser blur”, and the effect is similar to using a motion blur, it is not quite the same and it takes a long time to render.
Put a motion blur filter on the original environment map. (Note: This effect does not work well on flat surfaces.)

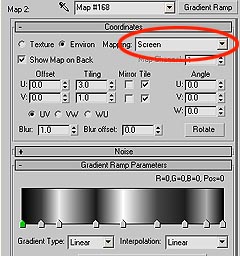
 An alternate method is to skip almost all the detail in environment map and only recreate the strong illumination of the reflection highlight by creating a new reflection map with a linear gradient ramp. As the most obvious reflections on a stainless steel surface are the lines, this gradient ramp map should use the “explicit map channel”.

 Spherical environment gradient rampTthe reflection still does not look realistic as it appears in every part of the surface equally, so we use a falloff map to specify the fading of the reflection area.
 Apply a falloff map over a reflection map.
 This picture shows the reflection falloff when using falloff in the raytrace material.The reflection is masked by falloff map. The fading distance is specifed by the falloff type. In the picture I used “perpendicular and parallel” No reflection map produces realistic effect on a flat surface besides Raytrace. I sometimes use gradient ramp maps on anisotropy to fake the effect on flat surface. As the anisotropy appears in the specular highlight only, the gradient ramp will appear on the specular area only and fading into the diffuse and ambient area.
 Anisotropic map
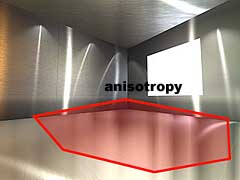
The anisotropy that appears on the specular highlight looks like a reflection.
(c) Montree T. , Smoke3dStudio


Latest Comments