“Caustics in MentalRay” by Toni Bratincevic
Before we start with tutorial please download the scenes that we will use in our training.
DOWNLOAD THE SCENES
INTRODUCTION
So we meet again (for those who passed through my GI tutorial 😉 ). This time we will learn how to set the caustic effect in mentalray for maya. As you already know, the calculation of caustics is not integrated in maya default renderer, and since we have lot’s bottles and liquids in our scene, we just need those little bright areas called caustics. 😉
So, let’s go to work. For those of you who have not used mentalray for maya yet, please go to the alias wavefront web site and dl it. It is free. If you want to know how to install it, there is explanation in my first tutorial … link!
In this tutorial we will explore the mentalray’s world of caustics. For our test scenes we will use three type of scene. The first one will be well known caustics example … glass with water in it. The second one is caustics produced by the sea surface and the third one is just a few simple objects with reflective surfaces. Since caustics take some time to render, except maya and mentalray you will need lot’s of patience when going trough this tuto. I’m joking, it render very fast. ;)Yes, you can also fake the caustics and achieve faster renders times, but you will not get the real caustic effect, and it can be a little problematic when it comes to moving lights or objects that produces caustic effect in the scene.
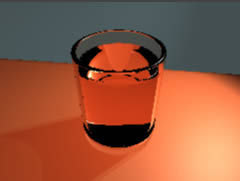
Let’s take a look at a few real time examples and say a few words about him. This was shoot with my new digital camera… yuppi! 😉
3Dtutorials.sk recommendation:
To maximise the realism of your 3D rendering we recommend to use high quality photo textures from the #1 texture website www.environment-textures.com
Real world examples:
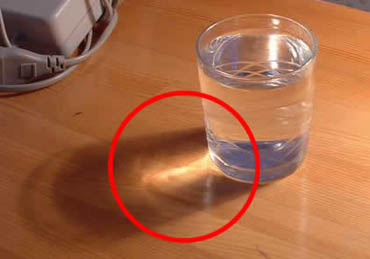
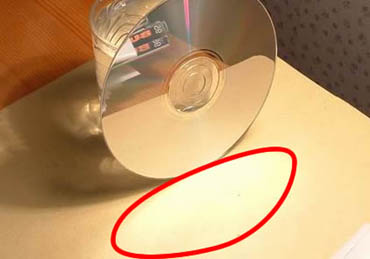
Caustics are marked with red lines on both pictures. In our first example of this tutorial we will try to make the caustics similar to the one in first picture. These two examples show two different kind of caustic effect. On the first pic the caustic are produced by refraction of the glass and the water inside, and on the second one by the reflection of the cd. When the light ray passes trough the glass and the water it changes the direction, this is called refraction. Because of cylindrical shape of glass, the light rays are refracted in that way that they become accumulated together when they exit the glass, and after they hit the desk, the part of it gets brightly illuminated… that is called the caustics. On the second example, the reflection of the CD object is guilty for the caustic effect on the paper below it. In this example the light rays are reflected from the CD, and after they hit the paper it gives it an additional illumination, that’s why the part of paper surface is brighter than other parts.
EXAMPLE 1 – The glass with water
Unzip the scenes from the zip file and load the scene01a.mb. When you open it, you’ll see that there are few simple objects in the scene… the wall, the floor, and glass with water in it. There are also few shaders. The ones we are interested in are the Water1 and Glass1. If you go to the attribute editor of the first shader you’ll see that it is highly transparent and that diffuse value is set to 0. This is because the glass or the water does not produce diffuse reflection of the light rays. So, if you create glass be sure to set the diffuse to 0 and increase transparency values. If you open raytrace option section of the Water1 shader you’ll see that it has refractive index of 1.33, and the Glass1 shader has refractiov value set to 1.5. These are the values these materials have in real world, so if you create the glass be sure to set the refraction to 1.5, since it’s default value it 1. Same goes to the water shaders, just set the refraction to 1.33. If you want to create crystal or diamond shaders you will have to use higher refraction values … just the refraction values table on the internet.
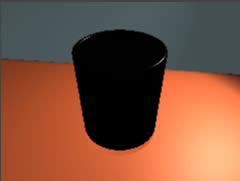
As you already know, we will use the mentalray renderer to render caustics. To use it go to the Render menu> Render Using > mental ray. Now open the render window from Window> Rendering Editors > Render View. You can also set the mentalray as your renderer from RenderView … click in the Render View toolbar where it says Maya Software and select mentalray. If you do a simple test render of the scen you just loaded it will look like this:
Oh my god, what is this? You won’t believe it but this is the glass with water in it, and it doesn’t have raytracing turned on. How to do this? As usually, in Render View go to the Options > Render Global’s (mental ray). When mentalrayGlobals window pop up, go to the Quality section and press the box on the right side of RenderQuality option. The mentalrayOptions1 will open. As you see the raytracing on the top is turned on. Try to render the scene again. This is what you’ll get.
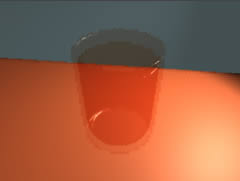
Why this? Because when the ray hit the glass, with these options ray is only refracted once and it needs to be refracted at least 6 times (glass, glass, water, water, glass, glass). That’s why we must increase the refracted ray depth to get the desirable effect. To do this go to the mentalrayOptions1 and in Rendering section set the Max Refraction rays and Max Ray Depth to 6. Render again and you’ll get this:

That looks nice. The next thing to do is to turn on the shadows on. So select the spotlight and go to it’s attribute editor (Ctrl+A). Open the Shadows section. On the top of the Shadow section is the Depth Map Shadows section. We will not use this type of shadows since it is faked shadow and can not be used in situations where the transparent surface need to cast shadow on the other objects. That’s why you must open the section below, the Raytrace Shadow Attributes, and turn on the Use Ray Trace Shadows option. Render again and this happens:


Latest Comments