“Building a character with polyspheres” by Glen Southern
1. POLYSPHERES
This image was created in the latest version of ZBrush and uses the all new Polymesh feature. As with most of the newer features in ZBrush Pixologic provide you with an extensive set of ZScripts to help you understand the basics. Polyspheres is no exception. The ZScript is the best way to learn! Run them.So, what are they then!. Polyspheres help you to model a large or complex mesh by allowing you to add inter-conected spheres to a group, one by one, until you have the desired shape. Remember when you were taught to draw as a kid? They told you to think of every object in terms of primitive shapes. Well this is the same only in 3D. Some people will liken it to metaballs but believe me, this is different.
The spheres that you have placed can be moved, scaled, rotated by themselves or as a group. To make an arm, you makes a ball, add a ball doe each joint and pull the fingers into the shape of a hand, easy.Take a look at the new-look transform panel. See figure 1. Notice that SYMMETRY is now in with the transform panel?When you are happy that the Polysphere model is complete you can then use a process called skinning. This creates a single mesh object based on the shape of the combined Polyspheres. There are settings for resolution and smoothness to help get the desired result.TOOL POLYSPHERE
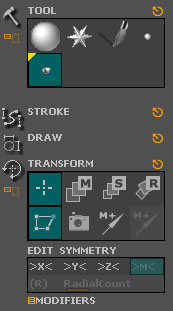 figure 1.
2. THE KROOT
I wanted to do this tutorial to show people how to take a character from an image and turn it into a 3D ZBrush image. For reference I used an image of a KROOT. This creature is taken from the War Hammer 40,000 game by Games workshop.Š
3. MODELING
The HeadAlthough I wanted to make this image to show the Polysphere feature I decided to model a head separately. I used a basic 3D Sphere to create the head and added features in EDIT mode.(How to model a head in ZBrush)
The Polysphere Body
The body of our KROOT is in a very defiant stance gripping his SPLINTER RIFLE. With Polyspheres you can set the symmetry feature so the body is completely symmetrical. For this image I needed to add spheres in a non-symmetrical way.
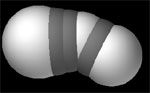
I started with a ball for the hips, a ball for the belly and one for the chest. I changed to ![]() with a draw setting of 1.This then allowed me to move any of the spheres without effecting the others. Any setting higher than one and the areas of affect is increased. As you move a sphere, the interconnecting gray areas lengthens or shortens accordingly.
with a draw setting of 1.This then allowed me to move any of the spheres without effecting the others. Any setting higher than one and the areas of affect is increased. As you move a sphere, the interconnecting gray areas lengthens or shortens accordingly.
To continue adding Spheres I switched back to ![]() .
.
I continued adding spheres for the shoulder and legs. I moved them into place and moved onto the left arm. Down the arm and onto the hands and then fingers. You need to be sure you are placing the joints in the correct place early on in the process. For example. If you wanted to move the entire arm later in the process you would have to reposition every sphere in the lower arm and hand. Get into the habit of positioning the parts right first time. This is where a good reference image helps. One way to be sure is to load the image you are trying to re-create into a back layer of the document. That way, you can match the spheres to the image as you go.
After a short while I had a full body (minus feet and a head) and I was ready to turn the Polysphere object into a mesh object by skinning it.
4. SKINNING
To turn the object into a ‘skin’ or a mesh object you now need to press ‘MAKE 3D SKIN’This will create a new mesh in the TOOL panel. You can change skinning settings to get different type of objects. For this one I used a resolution of 256 (maximum) and a SMOOTH setting of 20.My result can be seen below. This mesh or ZTOOL can now be altered as per a normal ZTOOL, i.e.. with the ![]() and
and ![]() features in the TRANSFORM panel
features in the TRANSFORM panel

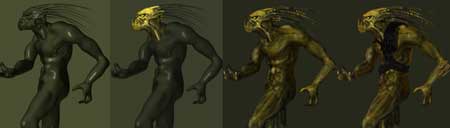
5. TEXTURING
I tend towards TEXTUREMASTER for this type of image but on this occasion I decided to place all the body ZTools (Objects) into the image and then paint and texture them in the canvas.
3Dtutorials.sk recommendation:
To maximise the realism of your 3D creatures we recommend to use high quality human photo textures from the #1 texture website www.3D.sk
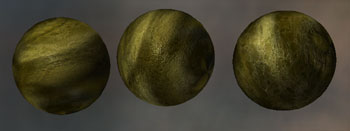
If you ever decide to use this method remember that you will have no texture saved with your ZTool and therefore will have to redo a texture every time you use that ZTool. I used three BASIC materials for the skin and decided to aim for a yellow/green skin tone. The materials had differing levels or NOISE, NOISE RADIUS, COLOR BUMP and specularity. I like to use a NEGATIVE number in the COLOUR BUMP as this helps to ‘raise’ light colored veins and arteries.
6. THE BACKGROUND
The background for this image was created by adding a 3DPlane to a background layer and painting onto it with the SIMPLE BRUSH. For this image I used a BASIC ALPHA BRUSH and the DRAG RECTANGLE stoke type. This process lets me build up layers of colour that quickly start to look like clouds or smoke.
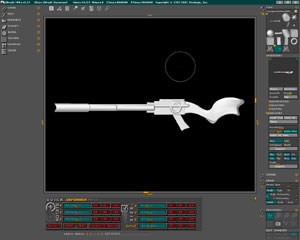
7. MULTIMARKER GUN
Although Polymesh allows you to make complex organic meshes I still like to use the tried and tested Multi-Marker. This little gem lets me take a set of primitive shapes and add them all together into a Polymesh object. One tip: Make sure that when you modify objects they you do it using the deformations panel. If you just change the sizes on screen the mesh doesn’t work correctly.
(c) Glen Southern, glen@southerngfx.co.uk


Latest Comments