“Blueprintsetup” by Joshua Murphy
In this tutorial, you will learn how to set up vehicle blueprints, or any reference photographs to model by. For this tutorial you will need a novice to intermediate knowledge about 3DS Max, or your preferred 3d application. In this tutorial, I will be using 3DS Max 9, so if you have an older version or if you are using a different 3d application, your button configuration maybe be slightly different.
I will be using the vehicle blueprints for the Lamborghini Murcielago. Although, the steps are the same for any other blueprints or reference photographs.
3Dtutorials.sk recommendation:
To maximise the realism of your 3D models we recommend using high quality photo references from the #1 texture website www.environment-textures.com
The first thing you want to do is to find sufficient blueprints of the car in which you wish to model. If you are not able to find any decent blueprints, reference photographs will work as well. You can find reference photographs and blueprints by searching Google or yahoo images. Most automobile blueprints look like the image below:

Once you have found the blueprints you want to use, open the image using Photoshop or any other photo editing software of your choice.
You now want to crop all of the different views of the vehicle like below:


While you are cropping your images, keep in mind to name them respectively. (e.g. lambo_front.jpg; lambo_side.jpg; and so on.) This may seem simple, but it will help tremendously later.
(See below)

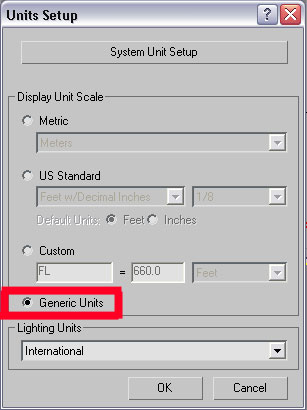
Now, once you have saved out the images respectively named, open your 3d application; in my case 3ds max; look on the main toolbar, go to the Customize menu and then select Units Setup.

Once you select Units Setup, a dialog box will come up asking which type of unit scale you wish to chose, select Generic Units.
You will see why we use Generic Units for the scale setup in the next step.
Next you want to do is to find the absolute size of the images that you saved in the earlier steps. You can do this using Windows Explorer, Photoshop, or by going into the file in which you saved the images and right-clicking the images and going to the Properties tab.
Below is an example of what you need to find. We will use this measurement to size the planes which we will model from in our 3d application.

Now, in your 3d application, go into your Front viewport and create a Plane.
Pages: 1 2


so do we have 2 separate planes for front and back?!
can we use same plane for both front and back view?!