“Angie – 3D Photorealism Portrait Tutorials & Digital Art Lessons – Part 4 ” by Ralph Manis
Body Textures, Background and Lighting
3Dtutorials.sk recommendation:
To maximise the realism of your CG character we recommend using high quality photo references from the #1 reference website www.female-anatomy-for-artist.com
Finishing Body Textures
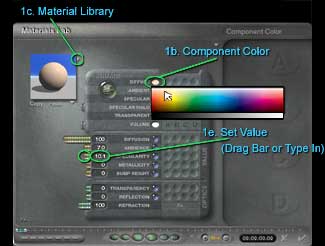
Selecting “Color Component” and adjusting “Specularity”
1. Creating Skin tone for the Neck and Chest-
![]() 1a. Hold down Ctrl+Shift and click on the neck or chest. Still holding down Ctrl+Shift, select all of the body parts that you want to apply your skin tone texture to.
1a. Hold down Ctrl+Shift and click on the neck or chest. Still holding down Ctrl+Shift, select all of the body parts that you want to apply your skin tone texture to.
![]() 1b. Click the “M”
1b. Click the “M” ![]() or (Ctrl+M) to open the “Material Lab”
or (Ctrl+M) to open the “Material Lab”
![]() 1c. Click the “Arrow”
1c. Click the “Arrow” ![]() in the upper right corner of the preview window to open the “Material Library” Click “Simple & Fast” and select the “Shinny Red Plastic” material then click the finish check mark
in the upper right corner of the preview window to open the “Material Library” Click “Simple & Fast” and select the “Shinny Red Plastic” material then click the finish check mark ![]() .
.
![]() 1d. Place pointer/cursor over the red oval in the “Diffuse” row, click and drag to select a color. Somewhere around light orange.
1d. Place pointer/cursor over the red oval in the “Diffuse” row, click and drag to select a color. Somewhere around light orange.
![]() 1e. Set “Specularity” to: 10.1 by dragging the bar or typing in settings and click the finish check mark
1e. Set “Specularity” to: 10.1 by dragging the bar or typing in settings and click the finish check mark ![]() . You may want to test render your scene to compare how your color choice matches your Face.psd texture and select another color if necessary.
. You may want to test render your scene to compare how your color choice matches your Face.psd texture and select another color if necessary.
•Tip: If you have not yet saved your file, now is a good time. Press Ctrl+S, name your file and Save. Do this often during creation to avoid loosing your work!
Creating Background Wall

View Top – Rotating and moving the “Stretched Cube” up to the Head/Body object.
1. Create Background Wall- To receive back lighting and as a simple background.
![]() 1a. Click “Create” then click the “Stretched Cube”
1a. Click “Create” then click the “Stretched Cube” ![]() . Click the “View”
. Click the “View” ![]() button and select “From Top” Place the
button and select “From Top” Place the ![]() Pointer/Cursor over the center “Y” axis, press and hold Ctrl then click and drag right to rotate 45° so that the “Stretched Cube” is facing the camera. Or, click the “A”
Pointer/Cursor over the center “Y” axis, press and hold Ctrl then click and drag right to rotate 45° so that the “Stretched Cube” is facing the camera. Or, click the “A” ![]() and in the “Object Attributes” pop up menu type 45 in the Rotate Y axis (under the General tab).
and in the “Object Attributes” pop up menu type 45 in the Rotate Y axis (under the General tab).
![]() 1b. Click and drag the cube so it is right behind the head/ body object. Place the
1b. Click and drag the cube so it is right behind the head/ body object. Place the ![]() Pointer/Cursor over one of the “Resize Handles” Hold down Alt, click and drag to enlarge the cube proportionately so that it is larger than the cameras viewing area.
Pointer/Cursor over one of the “Resize Handles” Hold down Alt, click and drag to enlarge the cube proportionately so that it is larger than the cameras viewing area.
•Tip: When moving objects, make sure you don’t click and drag on one of the re-sizing handles. If you do just press (Ctrl+Z) to undo. ![]() 1c. Click the “View”
1c. Click the “View” ![]() button and select “Camera View”
button and select “Camera View”
2. To select a texture for the “Stretched Cube” Click “M” ![]() or (Ctrl+M) to open the “Material Lab”
or (Ctrl+M) to open the “Material Lab”
![]() 2a Click the “Arrow”
2a Click the “Arrow” ![]() in the upper right corner of the first window to open the “Material Library” Click “Simple & Fast” and select the “Black” material then click the finish check mark
in the upper right corner of the first window to open the “Material Library” Click “Simple & Fast” and select the “Black” material then click the finish check mark ![]() . In the Material Lab hit the finish check mark
. In the Material Lab hit the finish check mark ![]() .
.
2b. Click the “View” ![]() button and select “From Top” to make sure your cube is not overlapping the Body/Head object. If it is then click and drag it back a little.
button and select “From Top” to make sure your cube is not overlapping the Body/Head object. If it is then click and drag it back a little.
Lighting
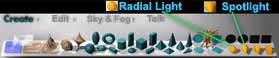
The Bryce 3D Create Palette 1. Creating a “Spotlight”
![]() 1a. Click “Create” then click the “Spotlight”
1a. Click “Create” then click the “Spotlight” ![]() icon then the “A”
icon then the “A” ![]() to open the “Object Attributes” Under the “General” tab type in the coordinate settings in the diagram below then click the finish check mark
to open the “Object Attributes” Under the “General” tab type in the coordinate settings in the diagram below then click the finish check mark ![]() .
.
Setting the Spotlight’s Coordinates
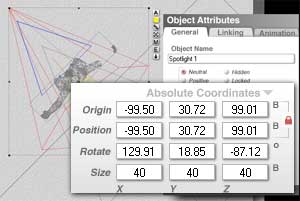
1a. “Spotlight” Coordinates
Spotlight Attributes…
Origin X: -99.50, Y: 30.72 and Z: 99.01
Rotate X: 129.91, Y: 18.85 and Z: -87.12
Size X: 40, Y: 40 and Z: 40
![]() 1b. Click the “View”
1b. Click the “View” ![]() button and select “Camera View” 2. Editing the “Spotlight”- Click “E”
button and select “Camera View” 2. Editing the “Spotlight”- Click “E” ![]() to open the “Edit Object” menu.
to open the “Edit Object” menu.
![]() 2a. In the top left widow, click and drag left or right and set to 8.
2a. In the top left widow, click and drag left or right and set to 8.
![]() 2b. In the bottom left widow, click and drag left or right and set to 100.
2b. In the bottom left widow, click and drag left or right and set to 100.
![]() 2c. You can change the color of the light with the small “Color Picker”
2c. You can change the color of the light with the small “Color Picker” ![]() box on the bottom. For this tutorial it is set on white. Click the finish check mark
box on the bottom. For this tutorial it is set on white. Click the finish check mark ![]() .
.
3. Create a “Radial Light” for Back Lighting…
![]() 3a. Click the “Radial Light”
3a. Click the “Radial Light” ![]() icon then the “A”
icon then the “A” ![]() to open the “Object Attributes” Under the “General” tab type in the settings listed in the diagram below then click the finish check mark
to open the “Object Attributes” Under the “General” tab type in the settings listed in the diagram below then click the finish check mark ![]() .
.
Positioning the Radial Light

Positioning the Radial Light
![]() 3b. Click the “View”
3b. Click the “View” ![]() button and select “Camera View”
button and select “Camera View”
![]() 3c. Click the “E”
3c. Click the “E” ![]() to open the “Edit Object” menu.
to open the “Edit Object” menu.
![]() 3d. In the top left widow, click and drag left or right and set to 16.
3d. In the top left widow, click and drag left or right and set to 16.
![]() 3e. Click the “Arrow”
3e. Click the “Arrow” ![]() icon and check mark
icon and check mark ![]() the “Volume Visible Light” then the finish check mark
the “Volume Visible Light” then the finish check mark ![]()
(c) Infinitee Designs, Ralph Manis, www.infinitee-designs.com


Latest Comments