“Making of Glimpse ” by Toni Bratincevic
At this stage, since I did the planar UV mapping on walls, the UVs for the windows are flat and the texture will look like it is stretched when I try to render it. To get a better result I decided to scale the inside window UVs like in third picture. So to scale them I’ve selected the points in viewport (using vireframe shading – pic1) and converted selection to UVs (pic2). Then in UV window I scaled the UVs just like in the third picture. Yes, the UVs for the windows are not perfect because when you get close to it it may be visible that the tex is distorted but since in this scene the windows are far away from the camera this will work pretty fine.
In viewport I have selected the points on the inner side of the window
Used tools:Just point selection
Then in UV editor I converted selection to UVs
Used tools in UV Editor:Select > Convert Selection to UV
After that I’ve scaled the UVs like in the picture above
Used tools:Scale tool
The last step to do, after the UV definition, is to make a snapshoot on which I will paint texture in Photoshop. So, I went to the UV Snapshot option in UV editor and I’ve set the resolution (1200×1200), the TGA format of the picture and clicked OK. After this I got the image with UV snapshot on my disk. Next step: start Photoshop…
The image with UVs that maya saved to the file, on which I will paint in Photoshop.
Used tools:In UV Editor > Polygons > UV Snapshoot
What I wanted to do in photoshop was to create the map that I will use to mix two textures together. The image needs to be grayscale … where there is white area in the image the first texture will be used, and where the black area is the second texture will be used. If it will be 50% gray, then the first and second texture will be mixed together. For this situation I didn’t used the gray tones, only black and white, but if you want to get more realistic results you can try to experiment with grays also. So, how can you create the mix image? Hardest way will be to paint it. But in some situations one trick works really nice, and that is to use photoshop cloud generator and threshold tool. But first thing that I’ve done was that I have created new layer. Then I’ve set the front color to white and back color to black, and used the Clouds generator in Render section of Filter menu. When I did this I have got something like in first image below. Now, I’ve used the threshold tool in Adjustments section of Image menu to get something like in second picture. At this stage I’ve made the layer with this cloud texture little transparent to see the boundaries of the UV map, and I’ve painted with white color on the texture to get something like the picture 3. 😉
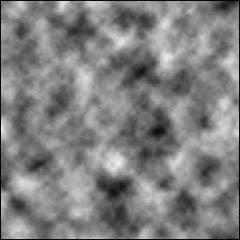

The result of cloud generator in Photoshop.
Used tools:Filter > Render > Clouds
After the threshold of the cloud layer.
Used tools:Image > Adjustments> Threshold
And the final mix image after I removed the unwanted parts by painting with white color.
Used tools:Brush Tool
Back to Maya. For the start I’ve created a simple lambert shader, picked one texture from 3Dtotal textures and connected it to the color channel of lambert shader. After that I went to the attribute editor of the place2D texture node of the image and set the repeat UV to 2 in both direction. As you can see, the shading network (pic1) is as simple as it can be, and the result of rendering is in picture 2.
A simple lambert shader with image file mapped to the color channel. It will be used as the top texture layer.
Used tools:Created Lamber shader + image file on color channel
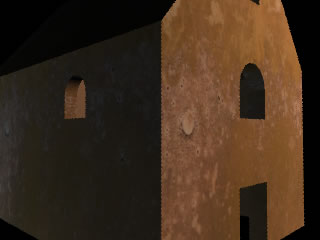
The result of the rendering with the lambert shader I’ve just created
To get a realistic stone you need to have bump mapping, so I’ve mapped the gray bump map for this stone to the bump channel of the lambert shader. The good thing in 3DTotal texture CDs are that you have already made bump textures for the color textures, so you don’t have to waste time creating them. As you can see in second picture, the bump map boosted the reality of the walls to higher level.
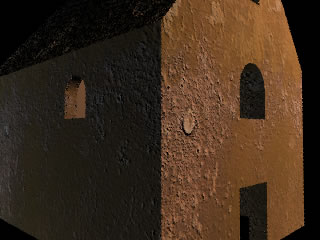
Since the original Lambert shader used above looks very flat when rendered, I have also connected the bump map to make things more real.
Used tools:Mapped the bump image to the bump channel, disconnected the default place2d node and connected the place2d node of the color image.
Again, the result of the rendering with the lambert shader + bump map


Latest Comments