“Setting up image planes ” by Tom Williams
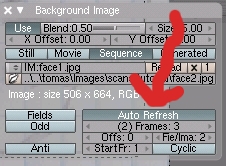
Next we go to the Timeline window and move to the next frame (2). It should be indicated in the bottom left corner in each editing window.
![]()
Hit the “Auto refresh” button in the Background Image box. And the next image should be displayed in the camera.Note: You no longer need to hit this button.
Move the camera around until the new image matches up with the mesh.
Hit the “I” again so that a new keframe is made. Move to frame three and repeat with the next image.Now simply continue adjusting frames, moving the camera around, and keying frames for however many images you have. Once you’ve finished setting up the image planes you can cycle through theme either with the Timeline or by using the left and right arrow keys on you keyboard.Final Angle:

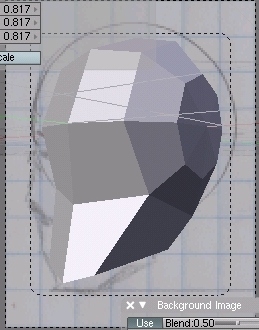
Image matched with an mesh:

As you can see, the images can be matched with any mesh. It’s all a matter of adjust the mesh to fit the images.Hope this has been helpful and simple enough. Have fun!
(c) Tom Williams, ibag4life@gmail.com
Setting up image planes tutorial
Popular Tutorials
-
 Free set of photo references for our members
Posted on Nov 15, 2010
Free set of photo references for our members
Posted on Nov 15, 2010
-
 Photo References
Posted on Oct 6, 2010
Photo References
Posted on Oct 6, 2010
-
 Modeling Competition
Posted on Dec 10, 2010
Modeling Competition
Posted on Dec 10, 2010
-
 Modeling a High Definition Building – part 1
Posted on Dec 9, 2010
Modeling a High Definition Building – part 1
Posted on Dec 9, 2010
-
 FREE photo reference sets for you – only for registered members
Posted on Oct 2, 2011
FREE photo reference sets for you – only for registered members
Posted on Oct 2, 2011
Try something new

Latest Comments