“Painless Organic Unwrapping” by Bill Quillinan
As we can see here, there is some stretching on the neck, the ear, the top sides of the skull and the upper forehead. And there is, of course, the very obvious seam running across the top of the head down the back of the neck. You could decide that the stretching is all in places that won’t be noticed, and call it a day, but I’ll assume that at some point you’ll want to know how to fix the stretching so I’ll say a few words about it.In the first place, if you compare the size of the test grid squares to the size of the quads in the mesh (see Fig 12) you’ll notice the quads are generally smaller than the test grid squares, in many cases a lot smaller. To increase the accuracy of our stretching corrections, we want the opposite case: we want most of the test grid squares to be smaller that most of the model’s quads. To get this, we must scale the test grid down, but since it’s a fixed size, we do this by scaling the UV map up.
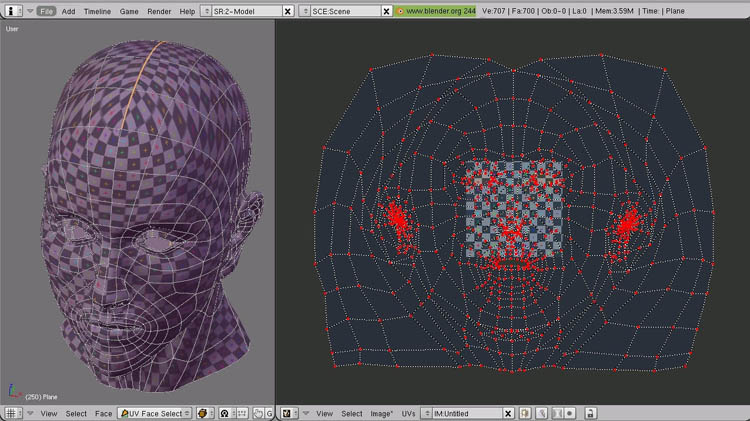
Fig 14 Scale the Test Grid by Scaling the UV Map
In the UV Editing window, select all vertices (they can remain pinned) and scale the UV map to be MUCH larger than the image grid. The work flow is fairly straightforward: zoom in on both the model and the UV map. Find an area on the model where the grid squares are too small or too large. On the UV map, if the grid squares are too small, move the UV edges closer together. If the grid squares are too large, move the UV edges further apart (they scale opposite to each other.)
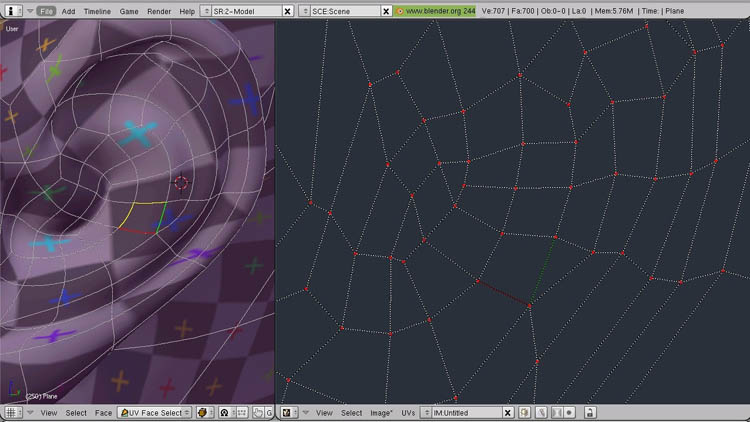
Fig 15 Locating a Quad on the UV Map
To locate where a particular quad is in the UV map, just select it, and its sides will turn Red, Green and Yellow in both the 3D view UV Face Select Mode and in the UV Image Editor window. When you reselect all, the colors will remain, (although you won’t be able to distinguish the yellow sides from the yellow edges in the UV map.) HINTS about tweaking the UV map to get rid of stretching.
First, recognize that perfection is impossible. You’re looking to get a good UV map to paint on. No one is going to be examining your finished work with a microscope.
Second, do the most visible areas first. In Adrianna’s case, this would include the tip of the nose, the front of the neck, inside the ear and under the chin, in that order. The remaining stretching will be covered by hair or clothing, so I wouldn’t spend time fixing it.
Third, start out large scale. In Figure 14 the UV map is scaled to roughly 10 to 12 times more area than the image grid. That’s the scale to use for very fine tweaking. Start out with the UV map roughly 2 to 3 times larger than the image grid.
Fourth, try to move verts in bunches. Use the brush select tool. Unpin the verts and use proportional editing. Play around with the Live Unwrap Tool.
Finally, practice. Well, that about wraps this tutorial up. I’m not going to talk about painting. There are excellent Tutorials already out on the web for painting diffuse and bump and spec map images using either Photoshop or the Gimp. About the only thing left to mention is exporting the UV map to use in either of these programs as a template layer.In the UV Image Editor header menu UVs>>Scripts>>Save UV Face Layout will produce a UV Image Export pop up menu. Size is the size of the resulting TGA image file (it’s square: default is 512×512.) Wire is the thickness of the lines in pixels. The default of 1 works well for the default size. If you increase the size to, say 2048, you might think about bumping Wire up to 2 or 3, so you’ll be able to see it in your painting program at that scale. Selecting OK will change your button window into an image save file window, where you can cancel if you choose.
Painless organic unwrapping tutorial
Popular Tutorials
-
 Free set of photo references for our members
Posted on Nov 15, 2010
Free set of photo references for our members
Posted on Nov 15, 2010
-
 Photo References
Posted on Oct 6, 2010
Photo References
Posted on Oct 6, 2010
-
 Modeling Competition
Posted on Dec 10, 2010
Modeling Competition
Posted on Dec 10, 2010
-
 Modeling a High Definition Building – part 1
Posted on Dec 9, 2010
Modeling a High Definition Building – part 1
Posted on Dec 9, 2010
-
 FREE photo reference sets for you – only for registered members
Posted on Oct 2, 2011
FREE photo reference sets for you – only for registered members
Posted on Oct 2, 2011
Try something new

Latest Comments