“Modeling Furniture” by Packt Publishing
Importing Models
To import a model, the process is very simple. We must use the File menu and select, Import. Then we have to select the proper file type from the list. The best file type, and the most common for furniture blocks, is the 3Ds file format, which belongs to the old 3D Studio application. There are some other good formats that work well with Blender, such as OBJ and LWO.
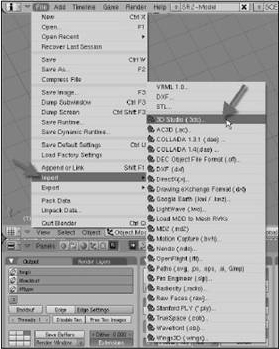
The 3Ds file format can store lights, and it works well with Blender. The only thing we have to take extra care about is that most models imported come with triangular faces, which are a bit harder to edit. But, if you don’t need to make any modifications to the model, this won’t be a problem.
Tip: Append or Import? Just to make things clearer, if you download a furniture model from a web site, and it’s saved in the Blender native file format (.blend), you should append the model. If you download or get a furniture model on any file format other than “.blend”, you will have to import it. Since most models aren’t saved in the Blender native file format, we can safely say that almost all furniture models that you find will require an import action to be placed in your scenes.
Modeling a Chair
Let’s start with something simple, such as a chair. Even for a simple model, it will help us deal with smaller dimensions and details. Here is an image of the model:
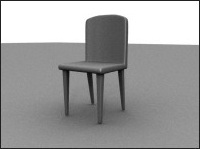
What’s the main objective of this modeling? We have to create this chair, with the minimum use of faces and vertices. A good amount of detail can be left for textures, and it’s always a good choice to use a lower number of vertices and faces in a model. If you consider one model, it won’t matter much. But with a large number of chairs, such as in a theater room, it can make a difference in render time.
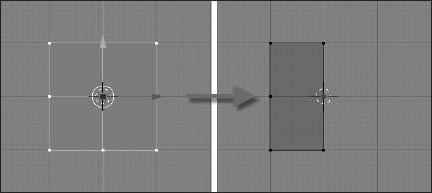
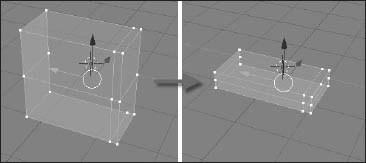
Let’s get started with a simple cube. Select this cube, and change the work mode to Edit. Select all vertices and press the W key. This will open the Specials menu. Choose subdivide, just once, from this menu. This will create new vertices and edges. Once these new vertices have been created, as shown in the image to the left, below, press the A key to remove all of the objects from the selection.
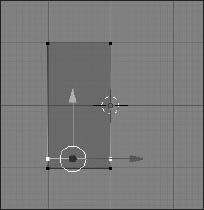
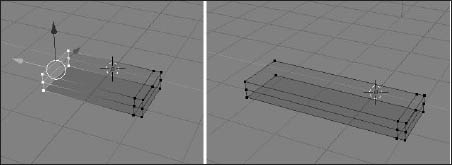
Now, select the vertices to the right, using the B key. Remember to change the view mode to Wireframe before using the B key, otherwise, we won’t be able to select the vertices behind the visible faces. When these vertices are selected, press the X key and choose Vertices to erase only the selected vertices.
Using the CTRL+R key, add a new edge loop to the model, as shown in the following image:
The next step is to change the scale of our model. Rotate the view to see the model in perspective view. Select all objects and press the S key, immediately after pressing the Z key. This will make the scale work only in the Z axis.
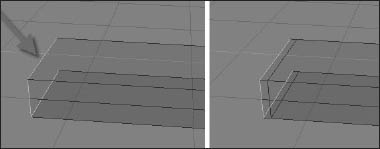
Now, select the vertices identified in the following image and erase them using the X key.
Change the selection mode to Edges, and select the edges identified in the following image. With the edges selected, press the E key to extrude them.
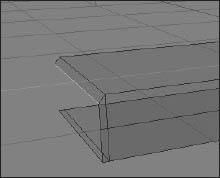
With the new faces created, we can now add some detail to the model. Select only the top edge of the previously created faces. Move this edge down just a bit. This will add a small declivity to the seat.
Modeling Furniture
Popular Tutorials
-
 Free set of photo references for our members
Posted on Nov 15, 2010
Free set of photo references for our members
Posted on Nov 15, 2010
-
 Photo References
Posted on Oct 6, 2010
Photo References
Posted on Oct 6, 2010
-
 Modeling Competition
Posted on Dec 10, 2010
Modeling Competition
Posted on Dec 10, 2010
-
 Modeling a High Definition Building – part 1
Posted on Dec 9, 2010
Modeling a High Definition Building – part 1
Posted on Dec 9, 2010
-
 FREE photo reference sets for you – only for registered members
Posted on Oct 2, 2011
FREE photo reference sets for you – only for registered members
Posted on Oct 2, 2011
Try something new

Latest Comments