“Invisible Tutorial ” by Jason Godbey
Once I get all my textures in place I go in and add a bump map to all my textures. I’ll either take the color maps and desaturate them in Photoshop or just put the color map in the bump map slot. Depending on the type of texture I will usually leave the bump intensity setting at 30 or take it up to around 65.
Lighting/Rendering
I kept the lighting simple as well. I used one directional light for the sun and rendered with Vray with global illumination.
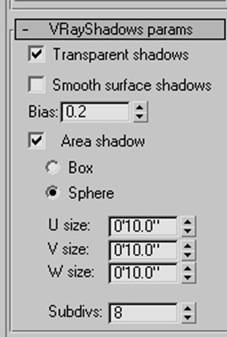
I enabled Vray Shadows and gave the light a slight yellowish tint.

Also, I made sure the Light Cone encompassed all the geometry in the scene.

And enabled Area Shadows.
I left most render settings at their default values. I will highlight the settings I adjusted.
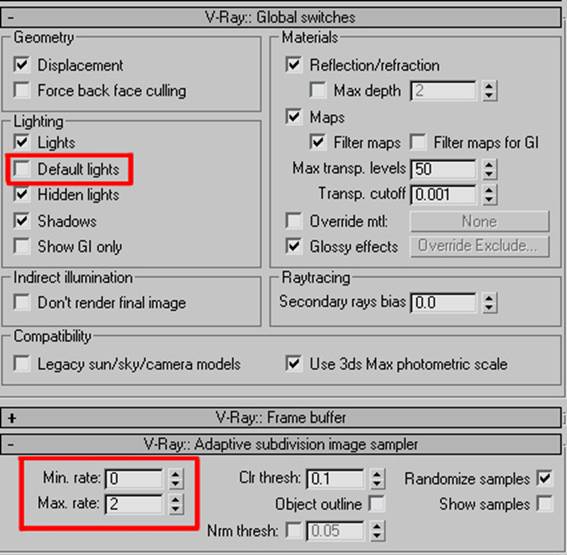
I uncheck Default lights and checked the On button to enable GI under the Indirect Illumination tab.
Reflection options : Be sure to check the Reflective option on under GI caustics in the Indirect Illumination tab and add color to the Reflection/refraction environment override option so that anything with reflective qualities will show up.
Color mapping : I tend to use Linear color mapping for outdoor scenes and Exponential or HSV Exponential color mapping for my indoor scenes.
Test rendering : When I want to see what I have quickly I’ll set the Adaptive Subdivision (under the Antialiasing tab) at : Min: -1 Max: +2 , for Irradiance Map settings: under Basic Parameters, I set the Min rate at -3 and Max rate at -3 . The HSph. SubDivisions on: 30 and Interp. Samples: 20 .
Final rendering : For the best quality I adjust the Irradiance map settings according to the size of the render. For example, a render at 640×480 : under the Basic Parameters I make the Min rate -3 and Max rate -1 . For double that size, I take the numbers down by one. So the Min and Max rate for a 1280×960 render would be -4 and -2 respectively. Double that size again, 2560×1920, and I take the numbers down by one again on the Min and Max rate (-5, -3) , and so on and so on for every time I double the size of my render. I take the Adaptive Subdivision Antialiasing Min and Max rate to 0 and 2 respectively for the final render. For the HSph. SubDivisions I will set it to around 60 and set the Interp. Samples to around 50 .
Invisible Tutorial
One comment
Leave a Reply
You must be logged in to post a comment.
Popular Tutorials
-
 Free set of photo references for our members
Posted on Nov 15, 2010
Free set of photo references for our members
Posted on Nov 15, 2010
-
 Photo References
Posted on Oct 6, 2010
Photo References
Posted on Oct 6, 2010
-
 Modeling Competition
Posted on Dec 10, 2010
Modeling Competition
Posted on Dec 10, 2010
-
 Modeling a High Definition Building – part 1
Posted on Dec 9, 2010
Modeling a High Definition Building – part 1
Posted on Dec 9, 2010
-
 FREE photo reference sets for you – only for registered members
Posted on Oct 2, 2011
FREE photo reference sets for you – only for registered members
Posted on Oct 2, 2011
Try something new

Wow, impressive!! 🙂 Thanks!