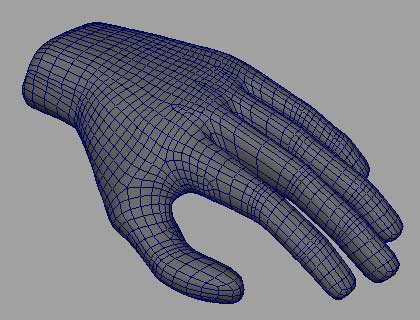
“Hand modeling” by Sean Hewitt
So next I’m going to make some bigger motions in sculpting by using the paint sculpt tool. I’m going to show you where the menus are for these tools but as I keep saying I have hot keys set up for all of these, so I never have to dig through these menus.
I start of by smoothing the model. Low poly models tend to be a little harder to control than a high poly model. So the plan is to smooth the model (so don’t delete the history after this step for now) sculpt it, then unsmooth it. Smoothing is also gives us a better idea of the final product as well.

I’m going to use the paint sculpt tool now to smooth the geometry out a bit more and resculpt the model some.

So some notes on the sculpt tool. Holing down u allows you to left click and bring up a marking menu to choose whether you want to pull push or smooth out your model. Right now we’re going to smooth it out. Holding down b and left click dragging lets you change the brush size. Holding down m and left click dragging lets you change the magnitude of the displacement.
Now when it comes to smoothing you want to be reserved. Smoothing averages out the verts of the whole model. What happens when you completely average all the verts of a model? They implode. So we want just enough to take some of the work out of the spacing for us Often after smoothing you have to resculpt a bit to get some of the volume back.


So after we’ve smoothed things out a little, we’ll put some of the volume back. To do this we’re going to hide the wire frame so we can see what we’re doing.

Hand modeling tutorial
7 comments
Leave a Reply
You must be logged in to post a comment.
Popular Tutorials
-
 Free set of photo references for our members
Posted on Nov 15, 2010
Free set of photo references for our members
Posted on Nov 15, 2010
-
 Photo References
Posted on Oct 6, 2010
Photo References
Posted on Oct 6, 2010
-
 Modeling Competition
Posted on Dec 10, 2010
Modeling Competition
Posted on Dec 10, 2010
-
 Modeling a High Definition Building – part 1
Posted on Dec 9, 2010
Modeling a High Definition Building – part 1
Posted on Dec 9, 2010
-
 FREE photo reference sets for you – only for registered members
Posted on Oct 2, 2011
FREE photo reference sets for you – only for registered members
Posted on Oct 2, 2011
Try something new

hello..i want learn imp hand maya..pls re
amazing modeling steps gr8 help . . . !
I appreciate your tutorial, while you omitted some critical details I still was able to figure out most of ’em, I guess we are just lazy to think on our own. So dude thanks again and keep ’em coming.
i missed out at the last stage, i know i will cope if i give it a 2nd shot… that is a good job sean hewitt. though i have done some hands before but not as realistic as this!
Agreed. This is a poor tutorial, You miss out all of things making it impossible to carry on to next steps, I got to page four and have no idea wtf to do.
I agree with Darren, when I’ve tried to followed those steps I can’t figure out on what to do.
seriously, you left out a ton of steps, and your written descriptions of what you are doing are like those “how to draw” books that go like, “step one- make a circle….step two- now you are done…” and the picture they are asking you to make is all shaded and rendered out…..needs way more pics of what you are doing here…almost missed the step where you moved the verts of that original bevel/merged em with that one edge loop….Also better angles + different ortho views of what you are doing might help….other than that, thanks for the tutorial!