“Girl in the iron shoes” by Chris Beatrice
Rough Painting
I started by painting in the biggest, simplest areas, to establish the overall color palette and to get some depth into the piece as quickly as possible, transforming the picture from a flat surface into a “space” or environment.
I created a simple guide for the light source, consisting of a pole, a cast shadow, and a line connecting them (I also distorted this as I move around the picture, according to the perspective of the scene).


Proper Headwear…
I felt the style of the girl’s hat was pretty important in reinforcing her character. I tried out several styles before settling on a classic bonnet, which gives the girl a kind of “American frontierswoman” look, which I think is really perfect for who she is.

Brushes & Painting
I use Corel Painter (version 8) exclusively for all the mark-making in my pictures, and paint on a single layer. I set up just one or two brushes for the entire picture (80% bleed, 20% resaturation, and 100% opacity), varying only the grain and of course the size for different applications. I also periodically go into Photoshop to resize or shift compositional elements, adjust levels and colors, etc.
Bleed and resaturation are tied to stylus pressure (bleed is reversed) so the harder I press down the more coverage I get, while the lighter I press the more smearing happens.
For this picture I wanted the scene to be somewhat serious, but still appropriate for a young audience. So I kept the rendering light and loose, well short of photo realism.
I made one final adjustment to the position of the girl’s right arm, which gave a lot more energy to her stride.
At this point the image has pretty much the look it’s going to have when completed, yet I was only about 25% of the time into the piece. From here I zoom in to 50% or 100%, working over each area of the piece adding detail.

Pebbles, Pebbles and More Pebbles
I wanted the pebble road to add some nice texture and interest to the picture, and really had fun doing it.
I built up the road in three main stages starting with the rough paint. I could have stopped at the second stage but I felt it needed more pebble coverage to really shine.
Each pebble was painted in a few quick strokes.


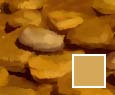
Step one is to visualize the forthcoming pebble…

Step two, is to lay down the cast shadow, following the form of the underlying surface of course… the colored square in the lower right of the image shows the painting color.

Step three is to paint in the entire volume of the pebble, using its darkest value (the value that represents the color of the parts of the pebble not exposed to the main light)

Step four is to paint the form of the pebble with the diffuse color (the color that represents the pebble when exposed to the main light).
Ordinarily I would then paint some specular (highlights), and some secondary (reflected light) on an object like this, but for this image I didn’t want anything that slick.
I generally painted as many as ten pebbles at a time, first laying down all the cast shadows, then all the volumes, etc.
I used the sticks lining the road to echo the bundle of chicken bones the girl is carrying, and also to help break up the foreground into two basic shapes (the road and the off-road area of greenery and large rocks).
Overlay Layer for Patterning
For the baby sling, I started by painting it without any pattern. I then painted the pattern on a separate overlay layer in just two solid colors (this is one of the extremely rare times where I use a separate layer for painting).
The image at right shows the pattern layer at normal opacity (on the right) and the final 70% overlay (on the left).

Facial Expression
The girl’s face was the last part of the picture I painted, and I played around with it quite a bit, painting several different versions before settling on the one on the lower right.

Final Adjustments
After finishing painting I enlarged the baby a little, and tweaked the colors to neutralize the palette just a bit, by pulling out some of the yellow.

About Me
Though my formal art training was in sculpture, most of my professional artwork has been 2d and 3d character design, illustration and animation for computer games. Initially I fell in love with using 3d software for creating artwork, but now I am much more interested in the stylized and hand crafted look of 2d painting and drawing. For software I use Corel Painter (8) and Photoshop.
I live in Natick Massachusetts with my beautiful wife, partner and best friend, and our beloved little daughter.

(c) Chris Beatrice, www.chrisbeatrice.com
Pages: 1 2


Latest Comments