Step 7
Little retouching. I strongly would not abound effect because the original photo in good quality and only need to add the right light and remove a few small details. To begin remove blemishes on the model ‘s skin. Create a new layer (Cmd/Ctrl + Shift + N or use “Create a new layer” icon) and clip it to a model’s layer (Cmd/Ctrl + Opt/Alt + G or right click on the layer > Create a Clipping Mask). Take a Clone Stamp Tool (S) (Sample: Current and Below, Opacity: 50%, Hardness: 0%, change the Size in in accordance with the size of the spot). Use clean skin near the spot as the source.

Step 8
Create another new layer and create a lighting on a model. Use soft Round brush with Opacity: 100%, as a color, the brightest areas on model’s clothing (hold Opt/Alt to quick switch between Brush Tool (B) and Eyedropper Tool (I)). Change layer Blending Mode to “Screen” and Fill around 28%. This method is very good at applying light colors, because you can use the color and accurately sure that dark colors will not affect the image. Clip this layer.

Step 9
Also, to raise the contrast of the individual areas of the image, I created another new layer (Blending Mode “Soft Light”) and I used the technique of the previous step to strengthen the shade, remove unnecessary overexposure on the face and add brightness on both sides of the model (from the light source). This time use Brush Opacity around 20- 30%. Clip this layer.

Step 10
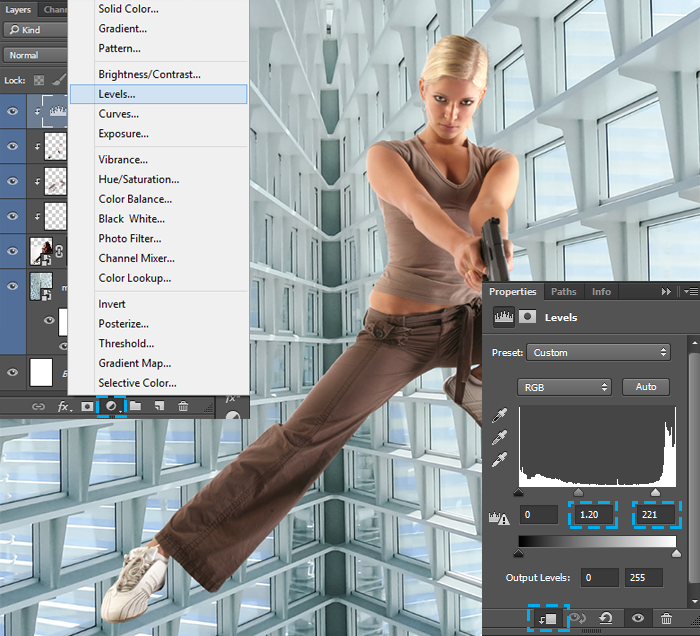
Now when you create a new lighting model, I increased the brightness of all the layers to give realism. Create a new adjustment layer “Levels” (use “Create a new Fill or Adjustment layer” icon or go to Layer > New Adjustment Layer > Levels…). In Properties tab click on “making a clipping mask” button and set for mid tones (gray slider) value 1.20, for a whites: 221. Вы часто бывали на студенческих вечеринках? Если да, то точно знаете, чем они заканчиваются, а если нет, то мы вам покажем. На нашем сайте много интересной порнухи на эту тему. Смотрите https://studsex.info/vecherinki порно вечеринка студентов и вы не пожалеете, так как каждая такая вечеринка заканчивается обычно отменным групповым сексом между ненасытными парнями и красивыми молодыми телочками.
Step 11
To enhance the shade I created another one new clipped layer with Blending Mode “Multiply” and Opacity around 35%. On this layer, with a black soft brush, I added a bit of contrast to the shadows. In this work the model is finished. I have shown you two (“Soft Light” and “Screen” + “Multiply” layers) very useful ways to retouch, which are very helpful when you need to cardinally change the lighting model (this technique is applied to the skin, face, etc.). The most important thing is clip all retouched layers to a model (Cmd/Ctrl + Opt/Alt + G or right click on the layer > Create a Clipping Mask) and not overdo it. Group all model’s layers by selecting all model’s layer and press Cmd/Ctrl + G or use “Create a new group” button at the bottom of Layer panel.

This is the end of 1st part. We will continue with 2nd tutorial in near future.
Pages: 1 2


Latest Comments