“Dynamic clothes” by John Johnson
Here is the Poser6 Materials Room (Simple display). The Advanced display looks almost the same as the Poser5 Materials room. Most important parts to note here are highlighted in red. Make sure you have the “eyedropper” icon selected so you can pick what model you want to be working with easily. Just click on the dress prop in the stage to see the materials for it. The Object menu displays the name of the object you are working with. Click the black arrow to select something from a list. The Material menu lists all of the materials associated with the selected object. Every object in Poser will have a preview material by default. Leave that one alone.
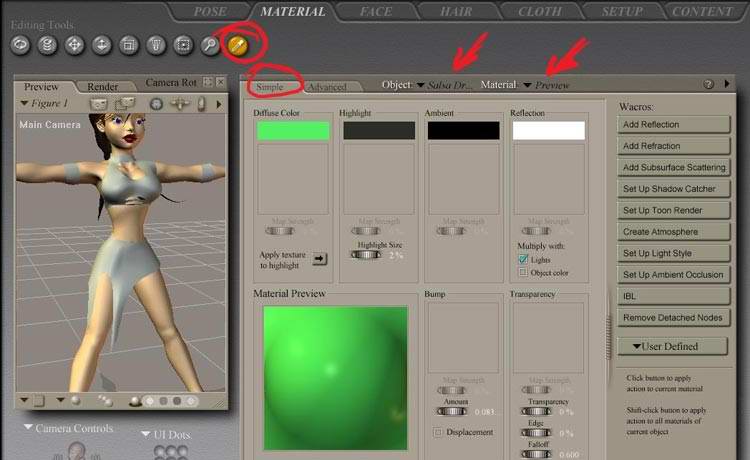
Click the arrow next to the Materials menu and you see the list of materials for this object. If you made a material for your dress in your modeling program, it will be listed here. If you imported your mannequin and then for got to remove all of its materials, they will also be listed here. Click the material you made for your dress model to view its properties.

If you didn’t make a UV Map and an image map for your character earlier, you will need to assign a material to it now.
1) Press the “Group” Tool to switch to the grouping mode.
2) If you want the material to be applied to the entire model, you can skip this step. Just make sure the whole model is red in the default group (Form112 in this example). If you wanted to have different materials applied, Create a New Group and select all the polygons that will be in it. Use the ‘+’ and ‘-‘ icons at the top of the Group Editor to add or subtract polygons.

Tip: Don’t use the ‘-‘ icon…ever! If you want to remove a polygon from a group, use the << or >> buttons to select a different group and then use the ‘+’ icon to add the polygon to that group. By using the ‘-‘ icon, you risk having polygons that don’t belong to any groups…and that will look bad when you render.
3) For each group you make (even the default group), you can assign a new or existing material.

Dynamic clothes
One comment
Leave a Reply
You must be logged in to post a comment.
Popular Tutorials
-
 Free set of photo references for our members
Posted on Nov 15, 2010
Free set of photo references for our members
Posted on Nov 15, 2010
-
 Photo References
Posted on Oct 6, 2010
Photo References
Posted on Oct 6, 2010
-
 Modeling Competition
Posted on Dec 10, 2010
Modeling Competition
Posted on Dec 10, 2010
-
 Modeling a High Definition Building – part 1
Posted on Dec 9, 2010
Modeling a High Definition Building – part 1
Posted on Dec 9, 2010
-
 FREE photo reference sets for you – only for registered members
Posted on Oct 2, 2011
FREE photo reference sets for you – only for registered members
Posted on Oct 2, 2011
Try something new

I am always looking for modeling with hexagon into poser thanks for the Tut. I would like to see more of the same,expecially tunics etc.