“Creating a Next-Gen Farm ” by Daniel Vijoi
The next image shows the main texture with the UVs mapped on it. As you can see, all areas are used.

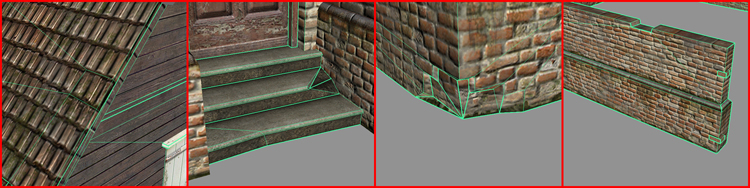
After the entire building is mapped, there is still room for adding some details like crooked or broken off roof tiles, missing wooden planks or bricks, a broken staircase, etc. This is done now as it’s easier to cut the geometry using the texture details than vice-versa.
The water tower has been done using the same methods. I tried reusing the texture as much as possible to increase the resolution. The same texture area has been used for the roof and bottom of the reservoir. The lower tileable area of the texture is for the pillars of the tower as well as the ladder and handrails. Besides this texture, I’ve used the 256×256 alpha texture for the framework.

All in all, technique differs from building to building, but the pipeline does not change much. The one vital aspect is optimization, being it geometry, UVs or texture. This has to be done as much as possible without compromising the shape of the object.
Moving on, the truck will require a slightly different approach, because vehicles can’t be done with tiles. That means that after the modeling is done, the UVs have to be done and then mapped before starting work on the texture.

The top part of the previous image shows the initial pristine model of the truck. The bottom images show the desired abandoned model that will be used in our scene. The advantage of building a pristine version of the object first is that we’ll have two separate models that can be used in the game.
Creating a Next-Gen farm
Popular Tutorials
-
 Free set of photo references for our members
Posted on Nov 15, 2010
Free set of photo references for our members
Posted on Nov 15, 2010
-
 Photo References
Posted on Oct 6, 2010
Photo References
Posted on Oct 6, 2010
-
 Modeling Competition
Posted on Dec 10, 2010
Modeling Competition
Posted on Dec 10, 2010
-
 Modeling a High Definition Building – part 1
Posted on Dec 9, 2010
Modeling a High Definition Building – part 1
Posted on Dec 9, 2010
-
 FREE photo reference sets for you – only for registered members
Posted on Oct 2, 2011
FREE photo reference sets for you – only for registered members
Posted on Oct 2, 2011
Try something new

Latest Comments