“Creating a Next-Gen Farm ” by Daniel Vijoi

Here’s another example of optimizing geometry, this time some planks that are leaned against the wall and a segment of the brick wall. Some of the details have been added later on in the creation process, after the textures have been created. These details include the missing bricks in the wall and the shape of the wooden planks.
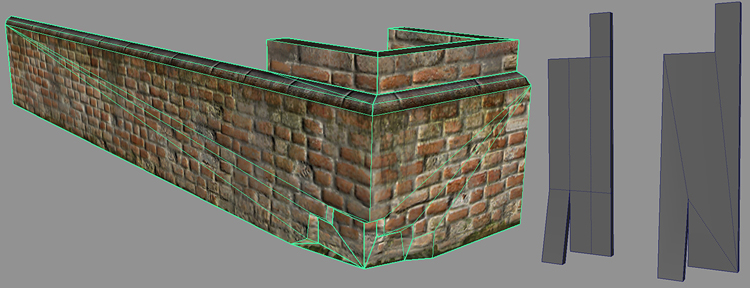
These last two examples are here to accentuate the fact that the geometry can be also optimized after the mapping phase. For example, if we would have added the missing brick detail before doing the textures, the textures would have been harder to build „around” the geometry than vice-versa.
As you can see, the geometry is very low in polygons, because small details like bricks, planks and roof tiles can be added in the texturing phase by means of normal maps. So in this case, only the large volumes will be represented by geometry, as the polygon budget for the building is just 1300 triangles. The water tower will have approximately 1000 triangles as its round shape requires more polygons. Going up in complexity, the car will have 2500 polygons. Being a prop asset, the car cannot be driven by the player so there is no interior for it and the car does not have a complex setup, like allowing the doors to be opened. Usually a prop car can serve as a cover for the player and the water tower can be used as a viewing/firing station. These are details that have to be taken into account when modeling for games, as some objects have to be usable and certain places have to be in the reach of the player so enough room must be provided for him/her to pass trough them without getting stuck. As next-gen games mean that the player go almost anywhere and see most of the asset from up close, the texture resolution (measured in pixels/meter) has to be consistent throughout the asset. Special care has to be given to neighboring pieces, as their texture resolution has to be exactly the same.
From the beginning of modeling, we have to keep some the model under the final polygon limit, as some details might have to be added later, or more cuts have to be done in the geometry to aid mapping the object.
One of the frequent problems faced by game artists is whether to build the asset under the polygon limit and then add more details if needed or build the geometry in higher resolution and then reduce the excess polygons to meet the budget. This is a personal decision that differs from artist to artist based on his own work style. When modeling for games in general, the silhouette is the second most important thing after the proportions of the building. A complex silhouette „fools” the eye into thinking the object has higher resolution than it actually has.
As mentioned earlier, we’ll add details to the contour of the building, things like missing roof tiles, wooden pieces, broken corners, extruded or missing bricks, deformed signs, and broken steps in the stairs, etc. These types of details make the building look more natural, so they have to be placed in easy accessible places by the player.
Before unwrapping the UVs, we have to make sure that the geometry is clean and that the scene is nice and organized. The scene can be organized by naming objects and placing them on layers. Also, using the Outliner in Maya we can delete any extra nodes that are not used in our scene.Using Cleanup we can make sure there are no errors in the geometry. The geometry is clean if after applying the cleanup command using the following settings, we do not end up with any selected geometry elements. After this has been done, the scene can be further optimized by using File->Optimize scene size and Edit->Delete all by type->History. To make sure all the polygons have correct normals, you can use Backface Culling to see if the normal orientation is ok or not.
Creating a Next-Gen farm
Popular Tutorials
-
 Free set of photo references for our members
Posted on Nov 15, 2010
Free set of photo references for our members
Posted on Nov 15, 2010
-
 Photo References
Posted on Oct 6, 2010
Photo References
Posted on Oct 6, 2010
-
 Modeling Competition
Posted on Dec 10, 2010
Modeling Competition
Posted on Dec 10, 2010
-
 Modeling a High Definition Building – part 1
Posted on Dec 9, 2010
Modeling a High Definition Building – part 1
Posted on Dec 9, 2010
-
 FREE photo reference sets for you – only for registered members
Posted on Oct 2, 2011
FREE photo reference sets for you – only for registered members
Posted on Oct 2, 2011
Try something new

Latest Comments