“Creating a high res mesh ” by Glen Southern
Here’s a little of my work flow in ZBrush 1.55b. I do use Normal mapping in Lightwave and this method can be used to create high res meshes to be taken out of ZB and used for normal mapping in LW (but thats not why I do it, I just like the ZB output)
3Dtutorials.sk recommendation:
To maximise the realism of your 3D characters we recommend to use high quality human photo textures from the #1 texture website www.3D.sk
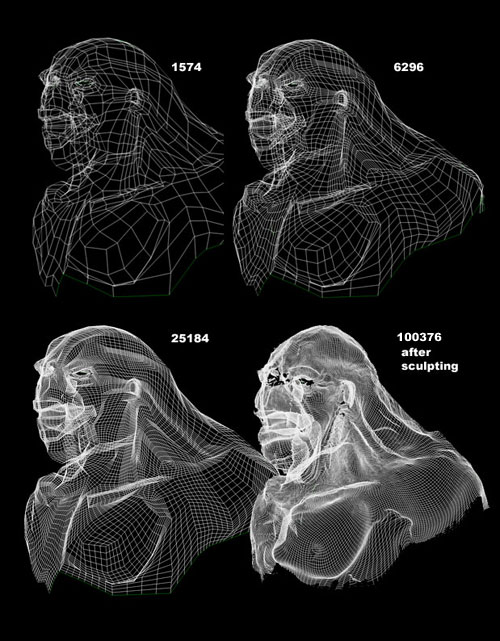
First off I create a mesh in Lighwave using the box method and point by point work (about 1600 polys). This is exported as an .OBJ

I import this into ZBrush (1) using the IMPORT button (this was new in this verison as we used to have to use a Polymesh star to get a mesh into ZB and that always seemed a weird way of working)
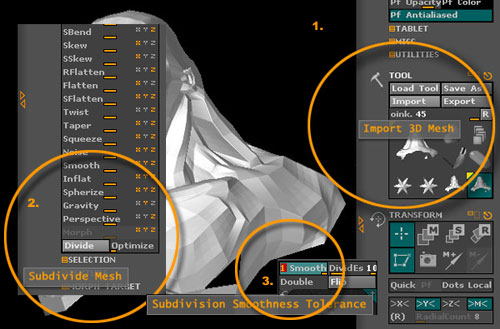
It is still only 1574 polys so I use DIVIDE (2) in the TOOL pallette. The mesh now is divided to 6296 polys, then 25184 and the final mesh used here was 100736.
NOTE: I use an Athlon 2.4 with 1.5 gig of ram and a 128 Geforce4Ti (these days little more than entry level) and the mesh in ZBrush performs as well at 100,000 polys as it does with 1500. In Lightwave my machine slows considerable at this count, a million would not be usable so having a normal map created in ZB in the next version will be essential!
The mesh can be subdivied using SMOOTH (3) (or subdivision surface resolution if you hover over the button).
NOTE: This isn’t changing the underlying geommtry and further just smoothing the mesh on display
With the mesh sitting in the TOOL pallette at a 100,000 plus polygons it is time to put it into the document window and edit it. The main way to working on a MESH in ZBrush is with the MOVE and DRAW POINTER. Basicaly DRAW allows you to push or pull polys in or out and move lets you drag them around. (4)
NOTE: Hover your mouse over any button and hold CTRL and you get all the info on that button. The buttons in the TRANSFORM PANEL tell you everything you could ever need to know about moving polys around. (5)
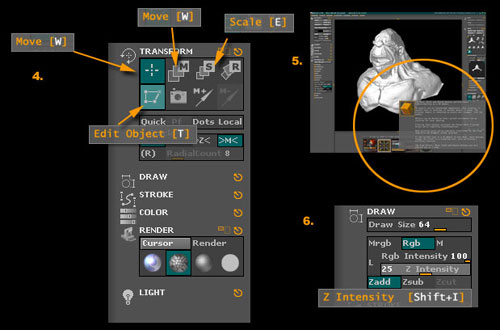
The ‘amount’ or ‘area of effect’ is defined by the size of your brush and the ‘Z INTENSITY’ in the DRAW panel (6)
Small Brush/Z Intensity = small effect on the polygons.
Using these tools it is possible to ‘draw’ (sculpt) viens, pimples, warts, creases, wrinkles, blemishes, eyelids, nipples, folds etc onto the mesh. Заходите на сайт Казиноз – крупнейший портал об азартных играх, и узнавайте все, что вам интересно. Истории реальных игроков и отзывы о казино здесь представлены в большом количестве. У Франк казино мобильная версия практически ничем не отличается от стандартной браузерной. Играть на Андроид будет удобно современным геймерам. Кстати, зеркала казино тоже доступны пользователям мобильных гаджетов.
What I am really intested to see is a mesh of a million+ polygons that I can DROP TO CANVAS (like Texturemaster or DeepPaint for those who know it) and use the multitude of 2D tools and brushes on the model in the document window then PICK IT BACK UP retaining the detail in the mesh not for a BUMP or SPEC map. That is worth waiting for!

I rendered the image (Render settings 8.) above with the 100,000 poly mesh using 1 light,(9) 1 material (SOUTHERN GI 7) specifically made to render in a document will ZB GLOBAL ILLUMINATION and ZMODE SOFT SHADOWS

(c) Glen Southern, glen@southerngfx.co.uk


Latest Comments