“Blending ecosystem materials in Vue 6 ” by Aziz Khan
10-Ok now Click on the last tab (Environment) this where the magic happen to blend the ecosystem materials, you will see bunch of sliders,
Altitude Range= if you slide to the right side you will tell the system to populate selected object in the center of the surface or anything you have, by sliding to the left you are telling the system leave the center portion and populate the objects around the surface except the center portion,
Fuzziness Top= this is pretty cool once you populate and blend your objects you will see a slide gape between 2 objects which is really not cool and realistic, by increasing the Fuzziness top you will be able to remove that gape and blend the materials more and more to create realistic results,
Fuzziness Bottom, this is the opposite of the Fuzziness Top,

11-Ok since you understood the options lets work on the materials to blend them out, still in the Material Editor on the top click on the button (Add Layer) once you hit the button this will ask you for a material chose the simple one as you can see on the image below,

12-Select the newly created material and hit the (Ecosystem) radio button,

13-Now you will see there is a extra material just delete it since we don’t need it,

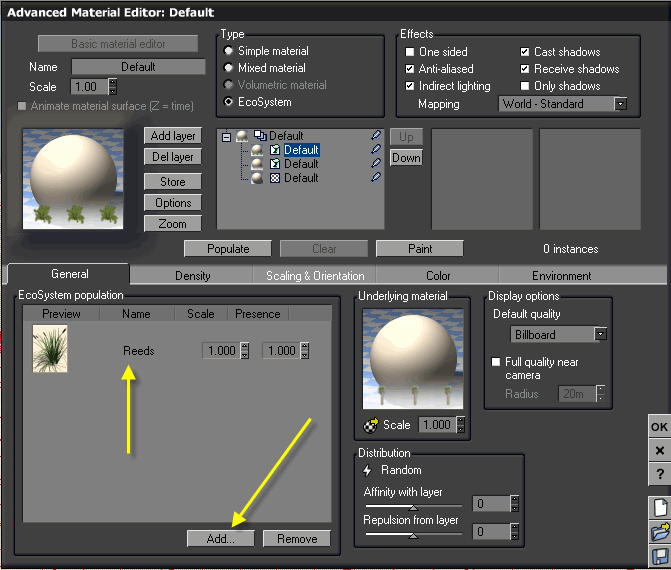
14-With new material selected go to General tab and add your desired plant in this case i choose (Reeds), you could chose anything you wish from the list of available plants and trees,

Blending ecosystem materials in Vue 6
One comment
Leave a Reply
You must be logged in to post a comment.


Thanks for the good writeup. It if truth be told used to be a enjoyment account it. Look complex to far delivered agreeable from you! By the way, how could we be in contact?