“10 Ways to Produce a Wireframe Image in 3Ds Max” by Michael Grote
Method 3:
This is another screen grab from the viewport but this time both ‘Smooth and Highlights’ (‘F3′ key) and ‘Edged Faces’ (‘F4′ key) are on.
Method 4:
This method is a render using a standard material with a ‘Gradient Ramp’ map in the diffuse slot. You must also tick the ‘Face Map’ box at the top of the material options.
The ‘Gradient Type’ needs to be set to ‘Box’ and the gradient colour should be set as shown in the following image:
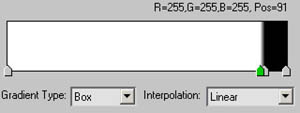
The distance between the two markers near the right hand side dictate the sharpness of the transition between the white and black and the closer they are to the right edge dictates the thickness of the wire in the render.
The ‘feature’ of this method, whether it be advantageous or not is that the larger the faces become on the model the thicker the wireframe becomes.
Method 5:
This method uses a ‘Composite’ material.
In the top slot you put a standard white material. In the second slot down, put a standard black material with ‘wire’ ticked at the top of the material options.
NOTE: This method is not compatible with the default ‘Scanline’ renderer. Therefore you will need to switch to Mental Ray.
Method 6:
For this method you will need to clone your original mesh then add a push modifier to the new cloned mesh, give the ‘amount’ a value of 0.01 then assign it a standard black material with ‘Wire’ ticked at the top of the material options. Then open the object properties window (via a right-click) and untick ‘Cast Shadows’ and ‘Receive Shadows’. This will increase render times a lot.
The original mesh will simply need a standard white material.
TIP: for rendering speed you should uncheck ‘Receive Shadows’ and ‘Cast Shadows’ from the splines properties window
Method 7:
You will need to have Vray for this method. Using a Vray material put a ‘vrayEdgesTex’ map in the diffuse slot. Use pure white as the standard diffuse colour, and pure black as wire diffuse colour.
Method 8:
Like Method 5, this method must be used with Mental Ray. It uses a specially made shader designed solely for this purpose. You can download this shader from the following link:
http://dl3d.free.fr/download_shaders.php
NOTE: If you have installed this correctly the material will appear as a map type (not a full material) and you should add it to the diffuse slot of a standard material
Method 9:
As with Method 7 this uses a material to do the hard work for you but this time you don’t have to be in Mental Ray for it to work. Here’s the link to the material:
http://www.bytegeistsoftware.com/prod01.htm#EM
After you download the file, add it to the ‘plugins’ folder of your 3ds Max folder and it will appear as a standalone material in the material editor.
Also, as with Method 4, the ‘feature’ of this method, whether it be advantageous or not is that the larger the faces become on the model the thicker the wireframe becomes.
Method 10:
This method involves going into edge mode selecting all the edges (Ctrl+A) then go down the modify panel and choose ‘Create Shape from Edges/Selection’. This turns those edges into a separate spline object. You then select the spline object turn one ‘Renderable’ in the Rendering rollout in the modify panel, and assign a self illuminated pure black material to it.
The wire thickness is very easily adjust here by changing the thickness value of the spline.
TIP: for rendering speed you should turn the amount of sides down to 3 on the spline and uncheck ‘Receive Shadows’ and ‘Cast Shadows’ from the spline’s properties window
I hope this tutorial was useful for you. Michael
(c) Michael Grote, www.mgrote.com
Pages: 1 2


Nice CrossFire Hack here! Additionally your site loads up very fast! What host are you using? Can I get your affiliate hyperlink for your host? I wish my site loaded up as fast as yours lol